Category Archives: Drawing

Perspective

Learning Objectives

Students will be able to demonstrate technical accuracy when documenting three dimensional structures on a two dimensional picture plane.  In addition to being able to accurately depict space, students will also be able to realistically render texture and value changes found in the landscape.


Materials

  • Drawing Pencils
  • Sketchbook
  • 18” by 24” sheet of white drawing paper
  • Yardstick

Sketchbook Mini-Assignment

1. Watch and take notes on the videos below.
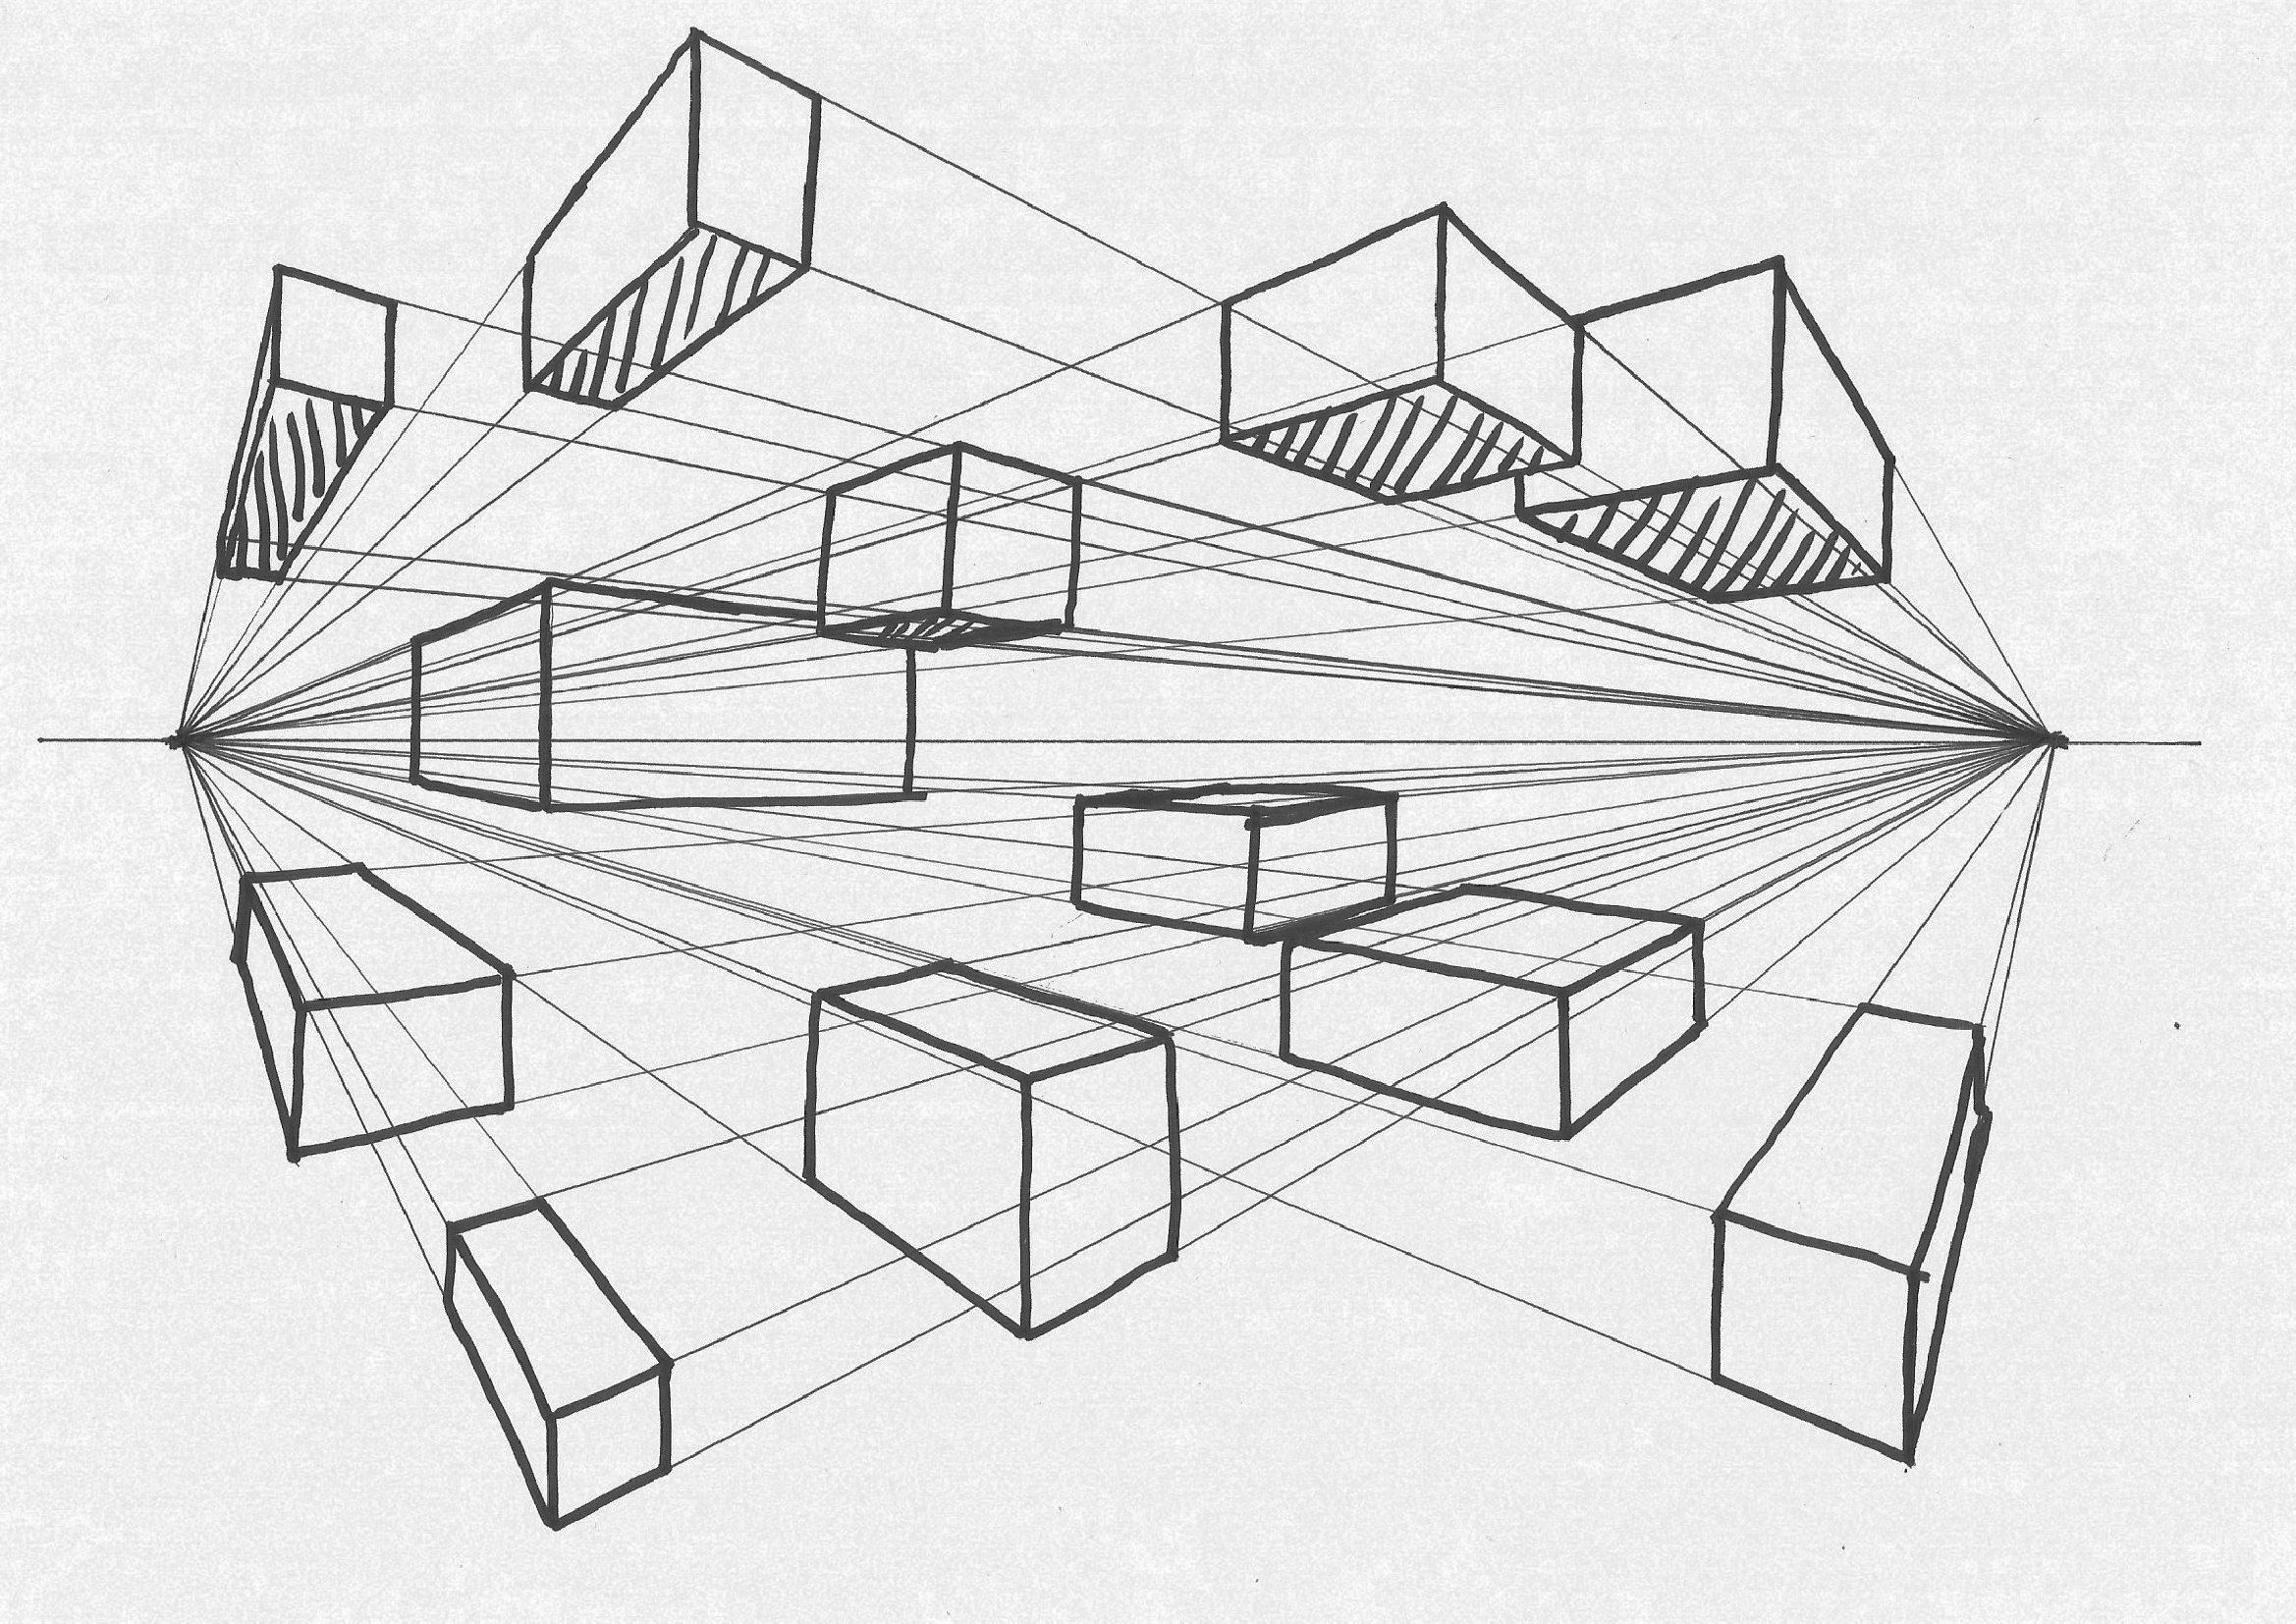
2. In your sketchbook, draw 2 examples each of a 1 and 2 point perspective.
3. Draw an example of a bird’s eye view and a worm’s eye view.


Project

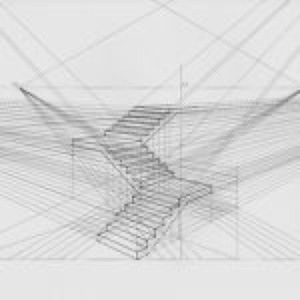
Perspective drawing is a method of working in two dimensions to create the illusion of a three-dimensional subject. The illusion may be presented as a drawing, painting, or other graphic work. Objects and their environments are depicted on a two-dimensional plane but appear as if viewed in real three-dimensional space.

Perspective theory is often separated into two parts: linear perspective and atmospheric perspective. Linear perspective addresses how the shapes, edges, and sizes of objects change in appearance when seen at different positions relative to the observer. The distance between the object and observer, the attitude (rotation and elevation) of the object and the viewing angle of the observer are all important in linear perspective.

When you have decided on what you are going to draw, the next step is to locate your horizon line.  The horizon line is usually your eye level.  This becomes tricky if you are sitting below or above your object.  These types of perspective are referred to as worm’s eye (below) and bird’s eye (above) views.

Your finished drawing should be free of smudges and wrinkles.  Take care of it.


Research

Lego Builder Website (This is awesome.  You need the Google Chrome browser.)

Personal Still Life

Learning Objectives

Students will be able to demonstrate technical accuracy through observational drawing. Students will also be able to demonstrate an understanding of value and shading and designing an effective composition.


Mini-Assignment

1. Set up an egg with one light source. Using graphite, draw it with all the appropriate shading in your sketchbook.
2. Crumple up a sheet of paper and light it with one light source. Using graphite, draw it with all the appropriate shading in your sketchbook.


Materials

White Paper
Graphite
Wooden drawer, shoe box or another box of similar size.
Personal objects of your choice (at least 10). Bring a collection of objects of various sizes, textures, colors and values.
Small flashlight or portable light that plugs in


Info

Drawing from observation is one of the oldest methods used to train the hand to draw what you see. Almost all artists throughout history have started off by drawing what they saw. In this exercise you will be forcing yourself to slow down and accurately record what is in front of you.


Process

Working on a sheet of white drawing paper, and using a range objects brought from home, create a still life. Write a paragraph about why you picked the objects you picked, and what the objects say about you as well as reflecting on the drawing that you have done and what you think went well and what did not, and why. Use graphite to carefully create shadows and highlights. There are no lines; only combinations of lights and darks. Draw carefully and slowly.

The still life you create should revolve around a wood drawer or box. Arrange your items so that there are varying shades of light and dark, rough and smooth, etc.

Paper Bag Narrative Self Portrait

Assignment Objectives & Description

Create a dynamic narrative value drawing of a self-portrait using a paper bag as a stand-in character for yourself. Consider the mood that you are trying to convey with the use of space, tone, lighting strength & source.  Keep in mind the narrative you are conveying toward the viewer.  For example: sad, lost, bored, happy, lonely, scared, playful, silly, etc. Try out a variety of scenarios, poses and lighting before settling on your final composition. Photograph your final scene to work from as a reference for the drawing. Tip—convert your photo to greyscale! Drawings will be evaluated on the overall success of the composition and conveyed narrative & overall execution of the value study drawing (i.e. full value range exploration, measuring accuracy, level of description and demonstration of the successful use of general to specific technical process covered in class)  Materials: Charcoal on 18”x24” drawing paper

Considerations for your project

SCALE: Is your bag scaled to it’s own world or is scaled to a human-sized world?

PROPS: What objects, furniture, spaces, etc. is your paper bag interacting with?  Do NOT add facial features or limbs to your paper bag—you can add some costuming, but keep it simple.  NOTE: You are not transforming the bag into a cartoon character. You will have to be creative with methods of folding, taping, weighting, etc. to manipulate an expressive pose and/or interaction with props and the background space.

*BACKGROUND & LIGHTING: Your narrative self-portrait must be place in and interact with a background and lighting that helps establish the overall mood of the drawing. Use of direct and/or indirect sources of light will be necessary to cast light and shadows across the entire composition.

Student Example

Student sample

Viewfinder template—cut out of cardboard or cardstock

Paper Bag and Egg

Learning Objectives

1. Students will learn the basics of accurate rendering and shading.
2. Students will also learn about composition through the choosing of objects and the arrangement of a still life.


Materials

  • White paper
  • Graphite
  • Brown Paper Bag
  • Egg
  • Onion

Sketchbook Mini-Assignments

1. Set up a group of objects in your room.  Light the group of objects with a lamp or a flashlight and turn off all the other lights.  Make sure the room is completely dark except for the one light source. Using dark pencils, find the darkest blacks and build those up first. Gradually build up values until you have correct values and well rendered drawing.


Project

Set up your paper bag and egg/onion in a creative arrangement. Be creative. Use the first image below for ideas. In your sketchbook, work out several compositions until you find one that works. On the white, 18 x 24 inch sheet of paper, gesture out your composition. Using various shades of graphite pencils (6H, 2H, HB, 2B, 4B, 6B), recreate the values you see in front of you. Try to be as accurate as possible with values, scale, texture and composition.

Research

No Marks

Learning Objectives

  1. Students will be able to demonstrate research and creative exploration outside the traditional means of art making.

Materials

  • Any materials you choose – or none at all

Sketchbook Mini-Assignments

  1. Read “Artists Draw a Blank” and take notes in your sketchbook. How do works like these justify themselves as art? What questions are the artists asking?
  2. Read “Conceptual Art” and take notes in your sketchbook.
  3. Read “How to Explore the Hidden World of Radio Waves All Around You” and take notes in your sketchbook. If these waves are present all around us, are they not drawings? What constitutes a drawing?

Project

  1. Create a work of art without using any marks.

Modified Contour Line Self Portrait

Student Example by McKenna Antram

Learning Objectives

Students will demonstrate ability to draw from observation while using continuous contour to describe form.
Students will display proficiency in compositional design.


Materials

Size—18”x24” Drawing paper—available in class (NO NEWSPRINT PLEASE)

Media—Graphite pencils (H or HB) + erasers + black fine Sharpie or Micron pen

For this assignment you will complete 1 detailed modified contour line drawing of yourself and your environment—from observation. No use of photos is allowed!


Project

Draw with a singular descriptive contour line and emphasize the unique contours around and across each form you draw.  Work slowly and attentively to avoid creating a generic or oversimplified representation. Some distortion and exaggeration is ok but do your best to mark the contours that describe volume around each form you draw. Begin lightly with pencil and make corrections with an eraser as you go. Use an ink pen or black, fine-point Sharpie at the end to make your drawing stand out.  Be sure to fill the rest of the page with details from your environment!


What to avoid

-Don’t use a rapidly applied sketching line
-Don’t oversimplify your features—drawing what you see, not what you think you see.
-Don’t fill in or shade any areas
-Don’t forget to add your background environment!


Project tips

-Find a creative placement for your mirror to capture you and your background environment
-Use strong lighting to create bold shadows on your face and clothing. Follow these borders with contour lines on your drawing.
-Description & details!!! Get into it!


Notes and Examples

Contour Line

“A line that delineates both the outside edge of an object and the edges of planes, as opposed to outline, which delineates only the outside edge.”
Drawing A Contemporary Approach

Blind Continuous Contour Drawing:

  • Nope, you can’t look at your paper while drawing
  • Slow and continuous singular line
  • Follow outer edges of form + borders of light and shadow that describe the surace contours
  • Be as descriptive as possible! Note subtle changes that define edges, textures, volume and form
  • You should feel “lost” in the process

Contemporary Artist

Alison Kunath

http://www.allisonkunath.com/blind-contour-portraits/

Modified Continuous Contour Drawing

  • Yes, you can look at your paper while drawing, but expect distortion
  • Slow and continuous singular line
  • Follow outer edges of form + borders of light and shadow that describe the surface contours
  • Be as descriptive as possible! Note subtle changes that define edges, textures, volume and form
  • You should feel “lost” in the process

Capstone Project Examples

Self portrait with your environment

Mark Making

Learning Objectives

Students will learn the basics of mark making using traditional drawing pencils. Students will be able to create and explore a variety of marks.

Info

“Marks are the alphabet that forms the words that make the prose, and are the elements with which the drawing is made.  Mark-making is the broad term used to include all marks that are made visible as a manifestation of applied or gestural energy. It is the gestural language of drawing, and marks are the component parts within it. There are an infinite number of marks possible, and our nomenclature for them is very limited – lines, dots, dashes, smudges, etc.  It is difficult to refer to specific marks, and know that the term adequately communicates its intended meaning.  Everybody makes his or her own unique set of marks and every medium has its own particular quality of mark.” (from Drawing Projects: An Exploration of the Language of Drawing)

Materials

  • Plain White Drawing Paper, 18″ x 24″
  • Drawing Pencils
  • Charcoal
  • Eraser
  • Chamois
  • other as needed

Sketchbook Mini-Assignments

1. Using your sketchbook and a number 2 pencil, create 2 entire pages of various marks.  Try to create as many different types as possible.
2. Using a different media – marker, pen, charcoal – create another 2 pages in your sketchbook. How does a different media produce different results?
3. Watch the videos linked below and take notes on them in your sketchbook. Do you identify with drawings that are more spontaneous or planned out? If you have someone else do the work, as is the case with Sol Lewitt’s drawings, is it still art? Why or why not?

Project

Using a large sheet of 18″ x 24″ white drawing paper, create a drawing using as many different marks as possible.  While you explore as many variations of mark making as possible, your finished drawing should have some form of composition.  It should not look like a random collection of lines, but a purposeful exploration of line.

You will be doing two of these drawings.

The first drawing should be based on responding to the drawing as it comes.  If you have a dark area, what would a light area look like next to it? Lots of smooth marks, what about contrasting them with rough marks?

The second drawing should primarily be based on geometric patterns and grids.  You may have some responsive drawing, but the majority of the drawing should be geometric and controlled

Research

Julie Mehretu
William Kentridge (Video)
Tomasz Talaj
Cai Guo-Qiang


Legs, Legs, Legs

Learning Objectives

Students will demonstrate technical proficiency using conte crayon. Students will be able to accurately render observed value changes and forms through their drawings.  Students will be able to create engaging and interesting compositions.


Mini-Assignments

Conte can be a very fussy material.  It does not erase well and when black and white conte are blended, the grey that is made is not very attractive. These mini-assignments are designed to help you get the most from the material.
1. Take a sheet of paper and crumple it up.  Set it on a table and light it so that the shadows are not too harsh. In your sketchbook, use black conte to draw the sheet of paper.  Focus on trying to draw the soft shadows; this will mean that you will have to control how hard you press down with the conte.  Once conte is applied, it is very difficult to erase, almost impossible.
2. Using a sheet of grey paper or a brown grocery bag, draw the same piece of crumpled paper.  This time however, use both black and white conte.  Experiment with blending the conte with paper towels, rags, chamois and blending stumps.


Materials

Sketchbook
18” x 24” sheet of gray drawing paper
Black and White Conte
Kneaded Eraser
Viewfinder


Mini-Assignment

1. Work out several different compositions in your sketchbook
2. Create a 10 step value scale in your sketchbook.


Process

After setting up the still life of mannequin legs, use your sketchbook and a viewfinder to locate and draw interesting compositions.  Sketch out multiple compositions from different positions in your sketchbook.  Zoom in close, squat or kneel, stand on a stool to find the most engaging composition.  After you have chosen the best composition, use black and white conte to work out the drawing on the 18” x 24” sheet of gray drawing paper.

The goal of this assignment is to focus on values, composition and proportion.  Try to choose a portion of the still life that gives you the widest range of values to work with.  As you are drawing, step back and look at your work.  Hang it on the board and back up 10 – 20 feet so you will better understand how the values are working.  Squint.  Pay close attention to proportions.  Remember to always start with the gesture and work out the composition, movement, and proportions at the gesture level.  Once the gesture is complete you should start working in the values.  Your drawing should look like the still life.  Objects that are round and smooth should appear round and smooth in your drawing.  Items that are rough should appear rough.


Artists

Michelangelo
Rembrandt
Susan D’Amato

Isomorphology

Learning Objectives

  • Students will be able to demonstrate an understanding of pattern and line quality.
  • Students will be able to demonstrate the ability to draw from observation.

Materials

  • Sketchbook
  • 1 sheet of 18” x 24” watercolor or white drawing paper (or larger)
  • Pencils (graphite or colored)
  • India Ink
  • Brushes
  • Sharpie Marker
  • Mushrooms, plants, bark, rocks, leaves, grass, bones, lichen, moss
  • High resolution color images

Mini-Assignments

1. Research cell and plant structures, fungi, lichens, wood, dendrites, cells, algae, hyphae, fabric and pattern. Use the websites isomorphology.com and n-e-r-v-o-u-s.com as a starting point.
2. Include at least 20 different images of the above materials. These can be drawings, photos or print outs.
3. Read and take notes – Gemme Anderson Isomorphology (2.7mb PDF)

Assignment

Create one large drawing that explores pattern and line. You can use multiple different patterns or one pattern repeated over and over, perhaps shifting the scale from smaller to larger. You may use graphite (keep the tip sharp), colored pencils, sharpie and ink. You should use ink to help you create value and three dimensionality.

The drawing does not have to be of any “thing” and may just be pattern (from natural elements) for the sake of exploring pattern. Think about composition and where you are leading the viewer to look. Are you going to have so much pattern that the drawing becomes afocal (no focal point) or are you going to have areas that have more details and some areas with less? Use moss, mushrooms, lichen, etc as a source of inspiration.

Some notes on Isomorphology

Drawing and handling each specimen enables close observation, revealing unexpected comparisons of form. Observational drawing involves hand-eye coordination, analysis, delineation, abstraction, improvisation, collage and deep concentration. Perception of the object is a process of transition from experience to judgement, insight to application.

Trained Judgement

Concentrated observation within the act of drawing creates new perceptual knowledge. The morphology is observed in detail – activating the process of comparison. Each form observed joins a bank of knowledge in the observer’s mind and each new drawing experience triggers a different formal memory stored in this bank. Each drawing adds value to each drawing previously made, and vice versa.

Abstraction

A necessary process of abstraction occurs during the observational drawing process. All knowledge of the object and its conventional context and name are forgotten; what is left is an involvement in the form of the specimen. The concentration shifts from drawing the whole to drawing a series of parts. This process, which concentrates on form, trains the artist to abstract: to draw and to play with the form, eventually without observing the object and thus entering a new realm of understanding.

From http://www.isomorphology.com

https://www.youtube.com/watch?v=lp4OpXZP4Cg

Research

NERVOUS
Gemma Anderson
Vija Celmins
Julie Mehretu

Interior / Exterior

Assignment Objectives

You will create a drawing that:

  • Fully explores value, surface texture, mark-making and composition in ink and pen. 
  • Reflects the conceptual and literal contrast of interior and exterior in an interesting manner.

Assignment Description / Instructions

For this assignment you will be creating a composition based on the idea of contrasting an object’s interior contents with its exterior shell.  Examples of subject matter might be one of the following: a purse, a fruit or vegetable, a toolbox, a refrigerator, a car, a backpack, a body, etc…  Think broadly about this subject matter and brainstorm several ideas.  Create your composition with via collaged imagery and/or photography Photograph your composition for reference during the development of your drawing.

Your final composition should be no smaller than 16”x20” and no larger than 18”x24.” Lightly sketch your composition on a full sheet of paper in graphite and trim your final drawing to when it is complete for presentation.

With an ink pen and variable sized nibs, build up the values and textures in your composition with a mark-making method of your choice—hatching, cross hatching, scribbled lines, etc…  Your drawing marks should be short, repetitive and use a hatching-like technique to build areas of value and establish a sense of volume in your composition.  Remember that this is an ADDITIVE process.  Sequence your drawing to find all of the middle tones first and proceed to build the darkest areas slowly. 

Leonardo De Luzio

Specific Material Requirements

Drawing paper (18”x24”)
Black India ink
Water
Ink pen & nibs
Small jar(s) with lids


Tips

*Remember to avoid outlining objects with solid contour lines.  Use broken lines instead. 

*Start your drawing with diluted ink! Dip the pen tip into 100% ink, blot, then dip into water, blot, then draw.