Category Archives: Digital

Shape Building

Learning Outcomes                       

  • Students will learn about drawing and modifying filled vector shapes with the selection and pathfinder tools.
  • Students will learn how to transform, reflect, duplicate, arrange, align, distribute, expand the appearance of paths into shapes, and group multiple shapes together as one unit.

Vocabulary and tools covered:

Artboard, Workspace, Fill, Monochromatic, Group, Align, Distribute, Pathfinder, Unify, Divide, Minus Front, Expand Appearance, Scale, Rotation, Reflect, Pencil tool, Pen Tool, Rectangle tool, Ellipse tool, Star tool, Anchor points.

** A note about Mac & PC key commands **

Key commands for this exercise are written for a Mac keyboard. To work on a PC, please review the chart below for necessary substitutions:

MacPC
Command ( / Apple key)Ctrl (Windows)
OptionAlt
ControlControl

Project

Be sure to watch the demo video on D2L as you work on this exercise!

Part 1: Drawing, Duplicating, Aligning, Distributing, and Grouping Shapes

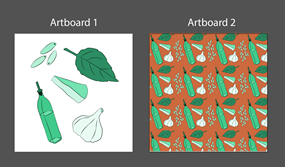
  1. Create a New File in Illustrator with (1) 10” x 10” artboard (File > New…)  Select RGB color space, 300ppi resolution.
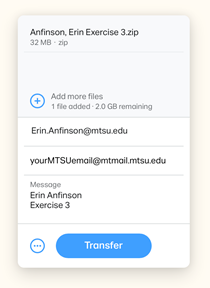
  2. Label the file LastName_FirstName Exercise 1.ai (Example: Anfinson_Erin Exercise 1.ai)
  3. Change your Workspace to Painting (Window > Workspace > Painting)
  4. In the Layers panel, double click the Layer name to activate it, change the name to 64 circles.
  5. Select the Ellipse (L) tool and click on the Artboard. Draw a 1”x1” circle in the new dialogue box. Fill with the color of your choice. To change the lightness or darkness of the color you select, double click the Fill paint chip in the toolbar and select the value of your choice.
  6. Use the Selection tool (V) to drag the circle up to the upper left corner.
  7. Keep the Selection tool active and duplicate the circle by holding the Option key and dragging a new circle to the right. Continue duplicating until you have 8 circles.
  8. Align the circles by selecting them all (Command A or click and drag around all), then open the Align tools by going to Window > Align. If needed, expand the Align menu to show “Align to” and select “Selection” from the drop down menu. Finally, click Vertical Align Center.
  9. Distribute the circles evenly between each other by keeping them all selected and clicking on Horizontal Distribute Center in the Alignment Window.
  10. Group the line of circles together by keeping them all selected and going to Object . Group (Command G).
  11. Duplicate the grouped line of circles eight times using the Selection tool and Option key method. Drag each new line of circles further down the artboard.
  12. Select all eight lines of circles and use the Horizontal Align Center and Vertical Distribute Center tools to align them on the artboard.  
  13. Group all of the lines of circles together by hitting Command G on your keyboard.
  14. Use the Direct Selection tool (A) to change the individual colors of circles in the group. To select multiple circles, hold the Shift key while making the selection.
  15. Save your work by going to File > Save or hitting Command S

TIP: To skip using the Align tool so much, simply hold the Shift + Option key while dragging the duplicate shapes.

Part 2: Drawing and modifying a variety of shapes

Drawing a variety of shapes

  1. Create a new 11” x 17” Artboard using the Artboard tool.
  2. Create a new Layer in the layers panel and label it Shape Combinations
  3. Zoom in to the top portion of the Artboard by holding Z and click-dragging your mouse to the right (zoom in) or left (zoom out). You can also Zoom by hitting Command + or – on your keyboard.
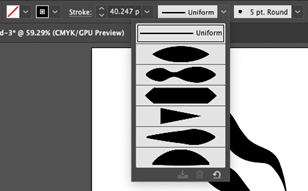
  4. Use the Rectangle (M), Ellipse (L), the Star (hidden under Rectangle tool, click and hold to reveal), and a freely drawn shape with the Pencil tool (N). Each shape should only be about 2” in its longest dimension. Fill the shapes with the same color.
  5. Use the Text tool (T) to type Shape Library near this row of shapes near your example
  6. Save your work (Command S)

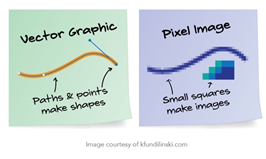
Expanding linear vector paths into shapes

  1. Use the Pencil tool (N) to draw an squiggly path with a stroke width of 16 and a non-uniform width variation.
  2. Use the Selections tool (V) to Option-drag a duplicate of your path next to it.
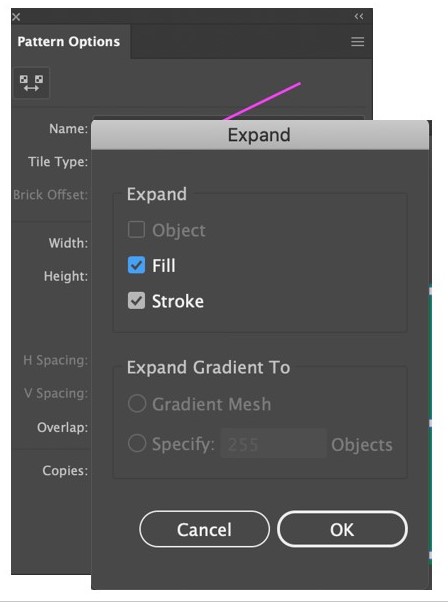
  3. Turn the duplicated path into a filled shape by going to Object > Expand Appearance
  4. Your vector path is now a filled shape. Select it with the Direct Selection tool (A) to see the anchor points.
  5. Use the Text tool (T) to type Expanded Line near your example
  6. Save your work (Command S)

Modifying shapes with the Direct Selection and Add/Subtract Anchor Point tools

  1. Use the Selection tool (V) to Option-drag a duplicate of your ellipse shape below the row of original shapes at the top the artboard. Change the shape’s fill color.
  2. Activate the Direct Selection tool (A) to reveal the shape’s anchor points.
  3. Double-click one the anchor points on the shape to activate it and move it. You can also change the curve by dragging on the revealed Bezier Curves.
  4. Next, activate the Add Anchor Point tool (nested beneath the Pen tool), and add an anchor point anywhere on the shape path. Use the Direct Selection tool (A) to move and/or pull on the curve of the new anchor point.
  5. Finally, activate the Delete Anchor Point tool (nested beneath the Pen tool), and delete an anchor point anywhere on the shape path.
  6. Use the Text tool (T) to type Modified Shape near your example
  7. Save your work (Command S)

Part 3: Using the Transform tools to rotate, resize, and reflect shapes

Resizing shapes

  1. Use the Selection tool (V) to Option-drag the splat shape from the shape library to an open space at below on the Artboard. Change shape’s fill color
  2. Use the Selection tool (V) to resize the splat shape by dragging one of the corner handles on the outlined frame and hold the Shift key while dragging to constrain the shape’s proportions.

Rotating shapes

  1. Using the same rescaled shape, select the shape with the Selection tool (V) and activate the Rotation tool (R).
  2. Click and drag the rotation of the splat shape to a new rotation angle. Tip: Holding the Shift key while dragging locks in only 45° angles while you drag.
  3. Don’t want the shape to rotate from the center? Change the rotation anchor point by clicking and dragging it to another place on the shape while the Rotation tool is active.

Reflecting shapes

  1. Using the same rescaled & rotated splat shape, select the shape with the Selection tool (V).
  2. Click on the Reflect tool (hidden under the Rotate Tool) or by hitting O on the keyboard
  3. Decide what axis line you’d like the shape to reflect across. (vertical, horizontal, diagonal?). Then, click the one end of the invisible axis line, hold the shift key and click the other end of the invisible axis line. The shape will reflect across this invisible axis line.
  4. Save your work (Command S)

Part 4: Using the Pathfinder and other tools to Unite, Divide, and cut shapes

Combining shapes with grouping

  1. Use the Selection tool (V) to Option-drag a duplicates of each of your of original shapes in the shape library to an open space at below on the Artboard.  Change all shapes’ fill color.
  2. Use the Selection tool (V) to arrange the shapes in any interesting, overlapping combination.
  3. Select all of the shapes and go to Object > Group or type Command G on your keyboard to group the shapes.
  4. To Ungroup the shapes, select the group, and go back to Object > Ungroup or hold Shift Command G on your keyboard.
  5. Use the Text tool (T) to type Grouped Shape near your example
  6. Save your work (Command S)

Unite Shapes

  1. Use the Selection tool (V) to Option-drag a duplicates of each of your of original shapes in the shape library to an open space at below on the Artboard.  Change all shapes’ fill color.
  2. Use the Selection tool (V) to arrange the shapes in any interesting, overlapping combination.
  3. Select all of the shapes and go to Window > Pathfinder to open the Pathfinder tool palette.
  4. Select the Unite option from the Shape Modes section of the Pathfinder menu. All of the overlapped shapes are now be combined in to a single shape.
  5. NOTE: this cannot be “ungrouped” like the previous grouping example.
  6. Use the Text tool (T) to type United Shape near your example
  7. Save your work (Command S)

Dividing shapes with drawn paths

  1. Use the Selection tool (V) to Option-drag a duplicate of a rectangle shape from the shape library to an open space at below on the Artboard.  Change shape’s fill color.
  2. Use the Pencil tool (N) to draw a path across the entire rectangle.
  3. Go to Window > Pathfinder to open the Pathfinder tool palette, if not already open.
  4. Select the rectangle shape and the drawn path, then click on the Divide option in the  Pathfinders section of the Pathfinder menu.
  5. Keep the divided shape selected and go to Object > Ungroup to ungroup and separate the newly divided shapes.
  6. Use the Text tool (T) to type Divided Shape near your example
  7. Save your work (Command S)

Dividing shapes with the Knife tool

  1. Use the Selection tool (V) to Option-drag a duplicate of an ellipse shape from the shape library to an open space at below on the Artboard. Change shape’s fill color.
  2. Select the Knife tool (under the Eraser tool) to draw a path across the entire rectangle.
  3. For a curved cut, drag the Knife tool across the shape in any curvilinear path.
  4. Go to Select > Deselect or hold Shift/Command/A on the keyboard
  5. Use the Selection tool (V) to separate the cut shapes.
  6. For a straight cut, hold the Option key while dragging the knife tool. Then follow steps 4 and 5 to separate and move the cut shapes.
  7. Use the Text tool (T) to type Knife-Cut Shape near your example
  8. Save your work (Command S)

Minus front to cut holes through shapes

  1. Use the Selection tool (V) to Option-drag a rectangle and star shapes from the shape library to an open space at below on the Artboard. Change shapes’ fill colors to 2 different colors.
  2. Use the Selection tool (V) to resize the rectangle shape to be smaller than the star shape and duplicate it 3 times. Arrange these small rectangles entirely within the borders of the star shape.
  3. Make sure these rectangles are on top of the star shape. If not, use the Send Back command, Command [ as many times as needed to send the star shape behind the rectangles.
  4. Go to Window > Pathfinder to open the Pathfinder tool palette, if not already open.
  5. Select all of the shapes, then click on the Minus Front option in the Shape Mode section of the Pathfinder menu. The rectangles will now be cut out holes in the star shape. Draw another shape with a contrasting color and move it behind the star to see the results.
  6. Use the Text tool (T)  to type Minus Front near your example
  7. Save your work (Command S)

Part 5: Independent Exploration

Monochromatic Campus Map Building Shape Design

Use the skills you just learned to create a monochromatic abstract design inspired by the 2D[EA1]  shapes of 5 buildings you choose from the MTSU campus map. Start by creating a new 8 1/2” x 11” Artboard in this Illustrator document. Remember to create a new layer in the Layers panel for this design and label it Exercise 1. When drawing your building shapes, use the Unify, divide/knife, Minus Front, Rotate, Reflect, and scaling tools as needed to create your final design. To demonstrate that you used the Minus Front tool to cut holes in 1 or more of your shapes, place other shapes filled with different values from your monochromatic color hue behind the cut out hole(s).

*Monochromatic = only 1 color + tints and shades

In Illustrator, to change the lightness or darkness of the color you select, double click the Fill paint chip in the toolbar and select the value of your choice.


Exercise Requirements (Assessment criteria)

  1. Use of monochromatic color scheme applied to all shape color fills in 5 different values.
  2. Demonstrated use of Minus Front to cut holes in some of the shapes.
  3. Demonstrated use of the Rotation tool
  4. All individual building shape layers must be United shapes
  5. Use at least 3 distinct varied shape sizes (small, medium, large) in design and the background should be addressed and included in the design.
  6. Final design should be grouped and centered on the Artboard and fill the entire artboard
  7. Workspace organization: Layers are labeled and on the correct artboards.

Exporting and submitting your exercise:

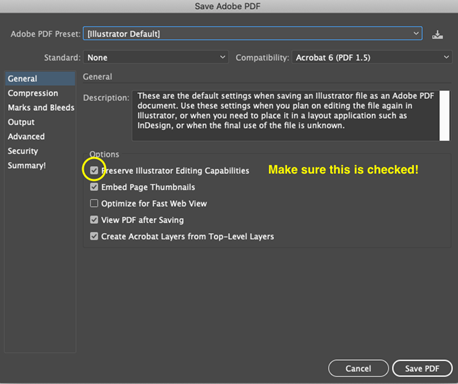
  1. When you have finished Exercise 1, go to File > Save As…
  2. Next, select Adobe PDF from the format options.
  3. In the next window, make sure “Preserve Illustrator Editing Capabilities” is checked!
  4. Click Save. Be sure you file is labeled correctly! LastName_FirstName Exercise 1.pdf (Example: Anfinson_Erin Exercise 1.pdf)
  5. Submit the PDF of your completed Exercise 1 file in the class D2L Dropbox

Pixel Based Images and Digital Collage

Student Example 1: Cassidy Bidwell

Learning Objectives

Students will explore Adobe Photoshop workspace
Students will demonstrate understanding of the relationship between image size and resolution
Students will use non-destructive image editing techniques to preserve original image properties


Exercise Files on D2L:

This handout, demo video, and all exercise .jpegs downloaded to your computer


Tools and techniques covered:

  • Resolution and image size relationship
  • Non-destructive editing vs destructive editing
  • Selecting and importing appropriately sized digital collage materials
  • Scanning collage materials to the proper resolution / size
  • Layer management
  • Layer masking with brushes, selection tools, and work paths
  • Adjustment layers and creating targeted clipping mask adjustment layers
  • Exporting and sharing files with WeTransfer.com

Project:

Part 1: Create a new Photoshop document and set up the workspace

  • Create a new folder for your Exercise 3 files on your computer’s desktop. Label the folder LastName, FirstName Exercise 3
  • Open Photoshop and create a new 8”x10,” 300dpi, RGB color space file, White Background. Label your file LastName_FirstName Exercise 3 (Example Anfinson_Erin Exercise 3)
  • Before you click “Create,” change the document size settings in the drop down menu from Inches to Pixels. Notice the size of your document—2400px x 3000px. Keep this overall pixel x pixel dimension in mind as work on the exercise. Try this handy online calculator for help with Inches Transfer Pixel calculations in the future!
  • Click “Create.”
  • Immediately Save this file by going to File > Save or hitting Command S on your keyboard and save it to your Exercise 3 folder
  • Go to Window > Workspace > Essentials

Part 2: Prepare all individual digital collage materials (jpegs)

The provided collage layer images were all downloaded in a variety of different sizes and resolutions that don’t match the 8”x10,” 300ppi collage canvas. To avoid any surprises and better understand the relationship between image size and resolution, you will take an extra step to prepare each separate collage jpeg before copying and pasting it to your final collage canvas.

Open and redistribute the pixels in your digital collage layer jpegs to 300ppi

  1. Leave your 8”x10” document alone and open each digital collage layer jpeg downloaded from D2L separately in Photoshop. To open an image file, go to File > Open… or type Command O on the keyboard. Select an image file and click Open.
  2. Once your image opens, examine its size and resolution in the Image Size dialogue box by going to Image > Image Size…
  3. Determine the overall size and resolution of your collage material. Redistribute the pixels to 300ppi by typing 300 in the resolution box. Make sure that Resample Image is NOT checked! *Take note of the unchanged pixel x pixel dimension and the changed inch x inch dimension of the image. It will be smaller if the image was less than 300ppi.
  4. Save your changes File > Save or Command S
  5. Click Ok on the following jpeg quality menu and keep your image open.
  6. Repeat steps 1-5 for all of your downloaded collage layer images.

TIP: Try this handy online calculator for help with Inches Transfer Pixel calculations in the future!

(EXTRA: Not in video… Move on to Part 3)

Rotate & Crop your image, if necessary

  1. Go to Image > Image Rotation > Select the degree you need to rotate your image
  2. Select the Crop tool (C) from the toolbar on the left side of the workspace.
  3. Click & drag the Crop tool to reframe tighter to the object you want to cut out.
  4. To commit to the crop, hit Enter or click the checkmark in the Crop options bar on top of the workspace. TIP: If at any point you want to cancel the crop, hit the ESC key

Spot heal and repair any damaged areas of your image, if necessary (DESTRUCTIVE)

  1. Select the Spot Healing Brush tool (J) from the tools panel. (Looks like a Band aid with a dotted 1/2 circle.)
  2. Look at the Tool options in the bar at the top of the window. Select the type of brush you want and the type of healing mark (Proximity Match) and keep Sample All Layers box unchecked.
  3. Select a small area on your image to heal. Use the left [ and right ] keys to scale the brush lager and smaller. Make the scale of the brush slightly larger than the spot you want to heal.
  4. Click and see what happens! If you are happy with the repair, move on. If not Undo (Command Z) and change the properties of the brush if necessary.

Part 3: Copy and paste individual collage images into main document

  1. Select an open collage image in the Layers panel, go to Edit > Copy or type Command C
  2. Go to your 8”x10” Photoshop document, go to Edit > Paste or type Command V
  3. Your collage layer will be pasted to a new layer in your 8”x10” Photoshop document. WARNING: Do not use the Selection tool (V) to enlarge or shrink the scale of the layer yet!
  4. Double-click the layer in the Layers window and rename the layer
  5. Repeat steps 1-4 for each open collage image
  6. When you are finished, close the individual collage images and save any changes.

Part 4: Non-destructive digital cutting with Layer Masks

Cutting out/around objects

OPTION 1: Use the Lasso tool to draw a selection and create a simple Mask

https://helpx.adobe.com/photoshop/how-to/selection-tools-basics.html

  • Select one of your collage material layers to digitally “cut”
  • Use the Lasso tool (L) from the tool bar and sure the “Add to Selection” option is on in the tool properties bar at the top of the screen. 
  • Click and drag to begin tracing around the border of the image selection you’d like to cut out, holding the Option key while you work. Holding the Option key will allow you to pause and add to your selection!
  • If you need to add small areas of the selection after it is closed, keep the Add to Selection property selected and simply draw the selection extension, making sure to cross the original path.
  •  If you need to remove small areas of the selection after it is closed, activate the Subtract from Selection property and draw the selection area to be removed. TIP: This is a great way to make holes!
  • When your selection is ready, create a Mask on your layer by clicking on the Add Layer Mask icon in the lower toolbar of the Layers panel. ­
  • Your selected image will be masked out and a new mask will be created next to the image in the layers panel. Notice that everything that was masked out is black and your image selection is white.
  • Save your work (Command S).

OPTION 2: Use the Quick Selection tool to draw a selection and create a simple Mask

https://helpx.adobe.com/photoshop/how-to/selection-tools-basics.html
  1. Select one of your collage material layers to digitally “cut”
  2. Use the Quick Selection (W) tool from the tool bar and begin dragging the tool over the area of the image you’d like to cut out. Change the brush size for the tool with the bracket keys [ & ].
  3. Refine the selection with the + and – options on the Quick Selection tool. You can access the – option by holding the Option key on your keyboard. It may take a few passes and brush size changes over the object to get the results you want.
  4. To correct small areas of the selection, use the Lasso tool, making sure the “Add to Selection” option is on.  
  5. When your selection is ready, create a Mask on your layer by clicking on the Add Layer Mask icon in the lower toolbar of the Layers panel. ­
  6. Your selected image will be masked out and a new mask will be created next to the image in the layers panel. Notice that everything that was masked out is black and your image selection is white.
  7. Save your work (Command S).

OPTION 3: Use the Lasso or Quick Selection tool to draw and save a reusable Path

  1. Select another one of your collage material layers to digitally “cut”
  2. Click on the Paths tab in the Layers panel
  3. Use the Quick Selection (W) or Lasso tool (L) to create a selection as in the previous examples.
  4. When you are finished drawing the selection, save the selection as a reusable Path by clicking on the flyout menu in the upper right portion of the Paths panel.         In the flyout menu, Select the Make Work Path > Tolerance level 1 pixel > Click OK or click on the Make Work Path icon in the in the lower toolbar of the Paths panel.
  5. Double-click the new path to name it and save it.
  6. Keep your newly named path selected and click on the Load Path as a Selection icon in the lower toolbar of the Paths panel.
  7. When your selection is ready, click on the Layers tab, make sure the correct layer is selected, and create a Mask on your layer by clicking on the Add Layer Mask icon in the lower toolbar of the Layers panel. ­
  8. Your selected image will be masked out and a new mask will be created next to the image in the layers panel. Notice that everything that was masked out is black and your image selection is white.
  9. Save your work (Command S).

OPTION 4: Use the Pen tool to draw and save a reusable Path

  1. Select another one of your collage material layers to digitally “cut”
  2. Click on the Paths tab in the Layers panel
  3. Use the Pen tool (P) tool from the tool bar to draw a path around the image you’d like to cut out. Remember to click and drag to pull the Bezier curve handles to best fit the curves you are tracing and close the path. The path you draw will appear in the Paths panel as a Work Path.
  4. You can use the Direct Selection tool (A) and/or the Add/Delete Anchor point tools to alter the path where needed. 
  5. Double-click the Work Path to name it and save it.
  6. Keep your newly named path selected and click on the Load Path as a Selection icon in the lower toolbar of the Paths panel.
  7. When your selection is ready, click on the Layers tab, make sure the correct layer is selected, and create a Mask on your layer by clicking on the Add Layer Mask icon in the lower toolbar of the Layers panel. ­
  8. Your selected image will be masked out and a new mask will be created next to the image in the layers panel. Notice that everything that was masked out is black and your image selection is white.
  9. Save your work (Command S).

Bonus! Need to Reverse or Invert a layer mask?

Double click the mask icon to reveal its properties, scroll to the bottom of the panel window and click Invert. Or simply hit Command I on your keyboard.

Altering and fine tuning masks with white and black paint

When using Masks to non-destructively cut images in Photoshop, black and white paint are the only colors you will use in the foreground color.

Black = Remove image on Mask            White  = Add image on Mask 

OPTION 1: Use the Brush tool (B)

  1. Keep the mask for your collage layer activated
  2. Select your Brush tool (B) and notice that your color choices are only black and white
  3. Check out the Brush tool settings in the upper toolbar and set to the desired setting. Example: Size 3, Mode: Normal, Opacity 100%, Flow 100%.
  4. Open the Brush Size drop down menu and change the hardness to 100% for our current purposes.
  5. Use black paint and brush to remove areas of the image you want to disappear. Remember you can change the size of the brush using the [ & ] keys!
  6. Change the foreground color to white, and try painting areas of the mask to replace the image.
  7. Experiment with different brush settings for different effects.
  8. Finish fine tuning the edges of your mask and save your work.

OPTION 2: Fill selected shapes with black paint to create holes through images

  1. Select a layer from the layer stack to cut a hole through.
  2. Create a mask by clicking on the Add Layer Mask icon in the lower toolbar of the Layers panel. ­Keep the layer mask activated.
  3. Use any of the already covered selection tools to create a hole shape in your image. Look for interesting areas to create “windows” to lower layers. i.e. doors, windows, glasses, binoculars, etc…
  4. Once our selection is made, activate the Paint Bucket tool (G), make sure your foreground color is Black (Press D on the keyboard to reset the color chips) and click inside your selection to fill the mask with black and cut the hole.
  5. Deselect (Command D)
  6. Save your work (Command S)

Part 5: Scale, Rotate, Flip, Duplicate, and Group your collage layers

Now that your collage layers are cut out, it’s time to have some fun transforming them on your digital canvas!

Transform the scale of your layer

  1. Select one of your masked collage layers with the Move tool (V). A frame should appear around your layer.  *If not, check Show Transform Controls in the top tool properties bar or hit Command T to activate the transformation tools.
  2. Hold the Shift key down, then click and drag a corner of your layer to reduce its scale while keeping it’s proportion. Do not let go of the Shift key until you are done dragging! 
  3. As you are dragging notice the percentage changes in the top tool properties bar. Do not enlarge your image past 100% or it will look pixelated and blurry. If you need a larger image, you must start with a higher resolution download or scan.
  4. Hit Enter on your keyboard to accept the transformation or click the Checkmark in the toolbar. To cancel a scale transformation, click the No sign icon.
  5. Save your work (Command S)

Rotate your layer

  1. Select one of your masked collage layers with the Move tool (V). A frame should appear around your layer.  *If not, check Show Transform Controls in the top tool properties bar or hit Command T to activate the transformation tools.
  2. With the Move tool, hover the cursor outside of one corner of the collage layer to activate the rotation tool. Click and drag to the desired rotation. TIP: If you hold the Shift key while you rotate, the layer will rotate at 45° angles.
  3. Hit Enter on your keyboard to accept the transformation or click the Checkmark in the toolbar. To cancel a scale transformation, click the No sign icon.
  4. Save your work (Command S)

Flip/Mirror your layer

  1. Select a cut collage layer with the Move tool
  2. Go to Edit > Transform… > Flip Horizontally (or vertically)
  3. Save your work (Command S)

Other Transformation tools

For more Transformation tools, and/or precise transformations to your layers, go to Edit > Transform > and select your tool from the flyout menu.

Duplicating layers

  1. Holding the Option key, select a cut collage layer with the Move tool (M). A second white cursor will pop up.
  2. Drag the duplicate of the collage layer elsewhere on the canvas. Notice where it appears in the Layers panel and rename if necessary for organization.
  3. Repeat for as many duplicates as you’d like.
  4. Save your work (Command S)

Group collage layers in a folder

If you’re Layers panel is getting cluttered with a lot of duplicates, you may want to Group them in a folder so they move as one unit on your composition.

  1. Select a multiple cut collage layers or duplicate layers with the Move tool. Hold the Shift key as you select each additional layer.
  2. Open the upper right flyout menu in the Layers panel and select “New Group from Layers…”  or type Command G on your keyboard.
  3. Name your new group in the pop-up window and hit Ok.
  4. Your group folder is now in the Layers Panel.
  5. Save your work (Command S)

Moving or Transforming individual layers in a group

If you need to adjust the position or transformation of an individual layer in a group folder, do the following.

  1. Twirl open the Group folder in the Layers panel and select the layer or layers you’d like to adjust. TIP: To select multiple layers, hole the Command key while selecting.
  2. Hit Command T on your keyboard to activate the Transformation properties. Then move, rescale, rotate, etc. the individual group layer.
  3. Hit Enter on your keyboard to accept the transformation or click the Checkmark in the toolbar. To cancel a scale transformation, click the No sign icon.
  4. Save your work (Command S)

Part 6: Using non-destructive Adjustment Layers to alter your digital collage

An adjustment layer applies color and tonal adjustments to your image without permanently changing pixel values. —helpx.Adobe.com

Once your collage materials are arranged, you can use adjustment layers to create controllable non-destructive changes to the color saturation, color balance, and contrast levels of your collage images.

Adding blanket Adjustment Layers to change the color saturation level of your collage

  • Create a new Hue/Saturation Adjustment Layer by clicking on the Create New Adjustment Layer icon at the bottom toolbar of the Layers panel or go to Layer > New Adjustment Layer > Hue/Saturation…. The adjustment layer will be added to the top of your stack and will affect every layer below it.
  • Activate the Adjustment Layer Properties by double clicking the adjustment layer icon.
  • In the Properties panel, drag the saturation level scale down to reduce the overall image color saturation.
  • Make adjustments until you are satisfied with your results.
  • Try activating the Colorize tool in the Adjustment layer properties panel too.
  • Save your work (Command S)

Adding blanket Adjustment Layers to change the Contrast level of your collage

  • Create a new Levels Adjustment Layer by clicking on the Create New Adjustment Layer icon at the bottom toolbar of the Layers panel  or go to Layer > New Adjustment Layer > Levels…. The adjustment layer will be added to the top of your stack and will affect every layer below it.
  • Activate the Adjustment Layer Properties by double clicking the adjustment layer icon.
  • In the Properties panel, drag the black, grey, and white sliders to adjust the contrast levels in your collage.
  • Make adjustments until you are satisfied with your results.
  • Save your work (Command S)

Adding targeted/clipped Adjustment Layers increase the contrast in 1 individual collage layer

Sometimes you just need to adjust the color or contrast of an individual layer. Through a simple step you can target or clip the adjustment to a a single layer or a group of layers in a folder.

  • Create a new Hue/Saturation Adjustment Layer by clicking on the Create New Adjustment Layer icon at the bottom of the Layers panel OR go to Layer > New Adjustment Layer > Hue/Saturation…. The adjustment layer will be added to the top of your stack
  • Drag the Hue/Saturation Adjustment Layer down the layer stack until it is on top of the individual layer or group folder you want to adjust.
  • Activate the Adjustment Layer Properties by double clicking the adjustment layer icon.
  • In the Properties panel, click the Create Clipping Mask icon at the bottom of the properties panel.
  • Any adjustments you make will now be targeted to the single layer or group. Make adjustments until you are satisfied with your results.
  • Save your work (Command S)
  • Repeat the above steps with other individual layers or groups and try different adjustment layers.
  • Save your work (Command S)

Part 7: Wrapping up your collage

After you have completed Parts 1-6, focus on wrapping up your collage and customizing it to with transformations, adjustment layers, duplications, and windows or holes cut through layers. See the requirements below for exercise assessment criteria.


Exercise Requirements (Assessment criteria)

  • Image size and resolution for all collage layers should be correctly prepared and copied/pasted into the 8”x10” digital collage. 
  • All collage layers should be digitally cut with a mask with no feathering applied to mimic cut paper. 
  • At least 1 layer should have a window or hole cut out to reveal a hidden layer below.
  • At least 1 layer is duplicated several times and duplicates are grouped in a folder.
  • At least 1 blanket adjustment layer should be used to change the color or contrast of the entire digital collage.
  • At least 2 layers or layer groups should have clipped/targeted adjustment layers
  • Workspace organization: Layers are labeled and on the correct art boards.
  • A jpeg is correctly exported and included in your exercise submission

Exporting and submitting your exercise:

Export a jpeg

  1. When you have finished Exercise 3, go to File > Export > Quick Export as JPEG
  2. In the Save As dialogue window, navigate to you Exercise 3 folder, label your image LastName_FirstName Exercise 3.jpeg (Example: Anfinson_Erin Exercise 3.jpeg )
  3. Next, click Save.

Compress your Exercise files and submit via the free file transfer website, WeTransfer.com

  • Compress or zip your Exercise 3 folder containing the original Photoshop .psd file & the exported jpeg. On a Mac, select the folder and go to File > Compress “Exercise 3 Folder.” A .zip file will be created next to the folder
  • Click Transfer files
  • You will receive a confirmation email when the transfer is downloaded

Path Drawing

Learning Outcomes

  • Students will familiarize themselves with the Adobe Illustrator workspace
  • Students will edit and modify drawn paths to create balance
  • Students will implement proper labeling to keep an organized workspace

Project

In this exercise you will be introduced to the Adobe Illustrator work space, vector paths, and vector path drawing and modification tools.

What are vector graphics and why are we using them?

  • Vector graphics are mathematically calculated paths with anchor points, not a collection of pixels. They are smooth and infinitely scalable.
  • When you draw a shape it is created with anchor points and a surrounding path that the program mathematically scales up and down

Directions:

  1. Watch the Vector vs. Raster (Pixel) video on D2L
  2. Load the exercise demo video to watch while you complete the exercise.
  3. Create a New File in Illustrator with (4) 8 ½” x 11” artboards (File > New…)  Select RGB color space, 300ppi resolution.
  4. Label the file LastName_FirstName Exercise 0.ai (Example: Anfinson_Erin Exercise 0.ai)
  5. Change your Workspace to Painting (Window > Workspace > Painting)
  6. Open the Layers Window (Window > Layers) and create 4 layers by clicking on the “Create New Layer Button.” Label each layer the following by double clicking on the layer name:
    1. Layer 1: Pencil Tool
    1. Layer 2: Pen Tool
    1. Layer 3: Modified Paths
    1. Layer 4: Exercise 1
  7. Save your work by going to File > Save or hitting Command S

Artboard 1 / Layer 1: Drawing vector paths with the Pencil Tool (Command N)

  1. Click the pencil tool to activate
  2. Double Click the pencil tool to alter its properties check only the following:
  3. Move Fidelity slider to Accurate
  4. Keep selected
  5. Option key toggles Smooth Tool
  6. Close paths when ends are within 10 pixels
  7. Select Ok and then draw a heart on your artboard, be sure to fully close the path!
  8. Experiment with changing the fill color, stroke color, stroke weight, and width profile in the top navigation bar
  9. Next, open the pencil tool properties and change the Fidelity to Smooth
  10. Draw another heart and notice the difference in the path smoothness and number of anchor points.
  11. Try using the Smooth Tool to smooth the path or hold Option key while using the Pencil too to engage the Smooth Tool

Artboard 2 / Layer 2: Drawing Vector paths with the Pen Tool (Command P)

  1. Hide Layer 1 in the layers panel and click on Layer 2 to activate
  2. Click the Pen tool to activate
  3. Draw a heart on your artboard with the pen tool by clicking to add anchor points, be sure to fully close the path! To make curves, click, HOLD, and drag Bezier curve handles each time you make a new anchor point.
  4. Experiment with changing the fill color, stroke color, stroke weight, and width profile in the top navigation bar
  5. Draw 2 more hearts on the art board for practice

Artboard 3 / Layer 3: Modify Paths with the Direct Selection, Smoothing, and Anchor Point, Path Eraser, Pencil, Path Join and Width profile tools.

Tool locations:

  • Direct Selection tool (A)
  • Smooth tool (under Pencil tool—click and hold to find)
  • Path Eraser tool (under Pencil tool—click and hold to find)
  • Path Join tool (under Pencil tool—click and hold to find)
  • Pencil tool (use pencil tool to connect two open paths)
  • Add +, Subtract -, and Anchor Point Curves Anchor Point tools (under Pen tool—click and hold to find)
  • Width Profile tool (Shift W)
  1. Hide the Pen Tool Layer and click on the Modified Paths layers to activate
  2. Use the Pencil tool with accurate Fidelity to draw a closed organic splat shape. Fill the shape with a color of your choice.
  3. Click on the Direct Selection (A) tool to activate the path and anchor points.
  4. Click one of the anchor points and drag it to a new location.
  5. Notice the Bezier curve handles that are also activated—click and drag the handles to change the curve
  6. Finally, try holding the option key, then dragging one of the Bezier curve handles to only move on side of the curve.
  7. Select the Smooth Tool to smooth a portion of the path by clicking and dragging the tool over the section you want to smooth. NOTE: You can change the fidelity of the smooth tool by double clicking it.
  8. Next, activate the Path Eraser tool and use it to erase a portion of your path by clicking and dragging the tool over the area of the path you want to erase.
  9. Next, use the Penciltool (N) to draw a new connection between the path ends.

ALTERNATIVELY…

10. Next, activate the Path Join tool, and rejoin the paths you just erased and split by dragging the tool from one end of the split/erased to its opposite end.

11. Change the general width profile of the drawn path by selecting a preset profile from the drop down menu in the Stroke properties.

12. Custom change the width profile of your drawn path using the Width Profile tool (Shift W). Activate the tool and click anywhere  on the path to widen or narrow the width of the stroke. TIP: Hold the Option key while dragging to only affect 1 side of the stroke.

Artboard 4 / Layer 4: Test your skills

Continue your practice with the path drawing and editing tools by creating a drawing of a leaf of the your official state tree (look it up online and make a drawing of it from observation). When you are done, scale your drawing up proportionately to fill the page by using the Selection tool (V). TIP: Keep the drawing proportionate by selecting the leaf shape and, hold the Shift key, and drag the corner box to scale the drawing.   

Don’t stress about making a perfect drawing! Just do your best and no tracing allowed!


Exercise requirements and assessment criteria:

  1. Use of a closed path for the general leaf profile drawing.
  2. Was an effort made to edit and modify the drawn paths. Is there a balance of smooth & organic/natural curves in the drawn paths?
  3. Use of stroke and variable width profiles on all drawn lines.
  4. Use of fill and stroke colors for all drawn elements
  5. The leaf drawing is proportionally scaled fill the page by using the Selection tool (V).
  6. Workspace organization: Layers are labeled and  on the correct artboards.

Exporting and submitting your exercise:

  1. When you have finished Exercise 0, go to File > Save As…
  2. Next, select Adobe PDF from the format options.
  3. In the next window, make sure “Preserve Illustrator Editing Capabilities” is checked!
  4. Click Save PDF. Be sure you file is labeled correctly! LastName_FirstName Exercise 0.pdf (Example: Anfinson_Erin Exercise 0.pdf)
  5. Submit the PDF of your completed Exercise 1 file in the class D2L Dropbox

Introduction to Principles of Animation

The 12 principles of animation were created by Disney animators Ollie Johnston and Frank Thomas in their 1981 book, The Illusion of Life: Disney Animation.  The purpose of these basic principles is to

  • Produce an illusion that animated characters and/or objects move according to the basic laws of physics
  • Provide dynamic and/or emotional timing to movements and overall appeal

The 12 principles were originally developed to be applied to hand-drawn animation techniques but they are extremely relevant and applicable to the production of ANY animated sequence or motion design.

The 12 principles of animation are:

  • Squash and Stretch
  • Anticipation
  • Staging
  • Straight Ahead Action and Pose to Pose
  • Follow Through and Overlapping
  • Slow In and Slow Out (Ease In and Ease Out)
  • Arc
  • Secondary Action
  • Timing
  • Exaggeration
  • Solid Drawing
  • Appeal

Not all of these are relevant to the introductory keyframing work we will be learning to do in After Effects. However, there are six principles that should be considered and utilized to improve the overall timing and appeal of your animated work! Pay special attention to these in the animated video from motion designer, Vincenzo Lodigiani.

https://centolodigiani.com/about

Anticipation
Staging
Slow In and Slow Out (Ease In and Ease Out)
Arc
Secondary Action
Timing
Exaggeration

The Illusion of Life on Vimeo:

For a more in-depth look at the principles of animation as they are applied to Disney films, check out this 16-minute film, Disney—The Magic of Animation, by kaptainkristian on YouTube:

Assignment:

Watch both videos and write a self-reflection about 2 of the following principles of animation you will emphasize as you animate your work in Project 5.

  • Anticipation
  • Staging
  • Slow In and Slow Out (Ease In and Ease Out)
  • Arc
  • Secondary Action
  • Timing
  • Exaggeration

Image Blending and Compositing

Learning Objectives

Students will demonstrate proficiency in image blending using gradient masks, feathered tools and blending modes


Tools covered & Techniques covered:

Blending modes and Opacity changes

Gradient masks

Using the selection tools and paint bucket to create blended masks

Changing the brush tool settings to draw blended masks

Adjustment layers


Project:

Part 1: Prepare your exercise document and imported exercise images

The provided layer images were all downloaded in a variety of different sizes and resolutions that don’t match the 8”x10,” 300ppi collage canvas. To avoid any surprises and better understand the relationship between image size and resolution, you will take an extra step to prepare each separate collage jpeg before copying and pasting it to your final canvas. TIP: Try this handy online calculator for help with Inches to Pixel calculations in the future!

Create a new 8”x10” Photoshop document (2400px x 3000px)

Create a new folder for your Exercise 4 files on your computer’s desktop. Label the folder LastName, FirstName Exercise 4

Open Photoshop and create a new 8”x10,” 300dpi, RGB color space file, White Background. Label your file LastName_FirstName Exercise 4 (Example Anfinson_Erin Exercise 4)

Before you click “Create,” change the document size settings in the drop down menu from Inches to Pixels. Notice the size of your document—2400px x 3000px. Keep this overall pixel x pixel dimension in mind as work on the exercise.

Click “Create.”

Immediately Save this file by going to File > Save or hitting Command S on your keyboard and save it to your Exercise 4 folder

Go to Window > Workspace > Essentials to reset the workspace if necessary.

Open your exercise images, redistribute pixels, and Desaturate the color

Download and open each individual exercise jpeg in Photoshop. Do NOT put these on your 8”x10” file yet!

Redistribute Pixels: Select an image and open the Image Size dialogue box by going to Image > Image Size…

Examine the overall size and resolution of the downloaded image. Redistribute the pixels to 300ppi by typing 300 in the resolution box. Make sure that Resample Image is NOT checked! *Take note of the unchanged pixel x pixel dimension and the changed inch x inch dimension of the image. It will be smaller if the image was less than 300ppi.

Desaturate the image by going to Image > Adjustments > Desaturate

Rotate your image if necessary. Go to Image > Image Rotation > Select the degree you need to rotate your image

Crop your image if necessary. Select the Crop tool (C) from the toolbar on the left side of the workspace.

Click & drag the Crop tool to reframe tighter to the object you want to cut out.

To commit to the crop, hit Enter or click the checkmark in the Crop options bar on top of the workspace. TIP: If at any point you want to cancel the crop, hit the ESC key

Spot heal and repair any damaged areas of your image if necessary (Destructive). Select the Spot Healing Brush tool (J) from the tools panel and many any repairs needed.

Save your changes File > Save or Command S

Click Ok on the following jpeg quality menu and keep your image open.

Repeat steps 1-6 for all of your downloaded collage layer images.

Part 2: Copy and paste individual images into main document

Select an open collage image in the Layers panel, go to Edit > Copy or type Command C

Navigate to your 8”x10” Photoshop document, go to Edit > Paste or type Command V

Your collage layer will be pasted to a new layer in your 8”x10” Photoshop document. WARNING: Do not use the Selection tool (V) to enlarge or shrink the scale of the layer yet!

Double-click the layer in the Layers window and rename the layer.

Repeat steps 1-4 for each open collage image.

Part 2: Non-destructive Gradient Layer Masks and Blending Modes

Use a Layer Mask and the Gradient tool to blend 2 images

Turn off the visibility of all of your layers except one you select to serve as the background by clicking the eyeball icon. Make sure the image you select covers the entire 8”x10” canvas.

Move this layer to the bottom of the stack and lock it in place in the Layers window by clicking on the Lock icon.

Select an image layer to  blend with the base image and move this layer directly on top of the base layer in your layer stack.

Add a mask to this layer by clicking the “Add a layer Mask” icon in the bottom of the Layers window.

Keep the layer mask icon highlighted and activate the Gradient tool (G) in the tool menu (hidden under the Paint Bucket)

Click and drag the gradient tool across image layer and see what happens. *Depending on how your gradient is set up from black to white. Whatever color is on the right of the gradient ramp is the color you start with. For example, if white is on the right, your image will be 100% opacity wherever you first click and will then fade to 0% opacity in the direction you drag the gradient tool.

Continue exploring this tool until you arrive at a blended result you like and be sure to try starting the fade in the middle of the image. TIP: Look for areas in the top and bottom image to visually connect with the blending, like a skyline.

If necessary, use a soft edged Brush tool (Command B) fine tune the edge of the mask, making sure you turn the brush Hardness and Opacity down in the brush properties toolbar.

Save your work (Command S).

Use the Selection, Layer Mask and Paint Bucket tools to create windows through image layers

Select an image with an area where an easy window or opening could be cut and blended in. Windows, doors, other openings, etc…

Use one, or several, of the selection tools—Polygonal Lasso (L), Quick Select (W), or Lasso (L)—to  select the area where the window/hole will be cut out.

After your selection is made, use the Paint Bucket tool and Black paint to fill the selection and remove that part of the mask.

Save your work (Command S).

Fill the cut out hole with an image from a different place

Select a different image from your layer stack that might work well to fill the window you just created and create the look of a window into a different space.

Use the Transform tool (Command T) to resize the image to fit within the window you just cut out (Hold the Shift key to keep it proportionate!)

Move the layer beneath the window layer in the stack or by typing Command [

Save your work (Command S).

Explore Blending Modes

Blending modes are different opacity & translucency! Instead of changing the overall opacity to make your layer more translucent, Blending Modes blend the layer with the layer below it in different ways, depending on the properties of the mode you select. For more information about blending modes visit this page in the Adobe online user guide.

Select an image to blend with all or part of your composition with a Blending Mode

Move this image to the top of your entire layer stack to start and keep it selected.

In the Layers panel, click on the Blending Mode drop down menu to open it. (It’s to the left of Opacity and should say “Normal”)

Select one of the Blending Modes from the drop down menu and see what happens. Try “Lighten” or “Screen” to get started. 

Save your work (Command S).

Part 3: Using Targeted Adjustment Layers synthesize your blended images

Add targeted/clipped Adjustment Layers to in individual blended image layers

Sometimes you just need to adjust the color or contrast of an individual layer. Through a simple step you can target or clip the adjustment to a single layer or a group of layers in a folder.

Create a new Levels Adjustment Layer by clicking on the Create New Adjustment Layer icon at the bottom of the Layers panel OR go to Layer > New Adjustment Layer > Levels…. The adjustment layer will be added to the top of your stack

Drag the Hue/Saturation Adjustment Layer down the layer stack until it is on top of the individual layer or group folder you want to adjust.

Activate the Adjustment Layer Properties by double clicking the adjustment layer icon.

In the Properties panel, click the Create Clipping Mask icon at the bottom of the properties panel.

Any adjustments you make will now be targeted to the single layer or group. Make adjustments until you are satisfied with your results.

Save your work (Command S)

Repeat the above steps with other individual layers with the goal of trying to improve the overall synthesis of your blended images.

Save your work (Command S)

Part 4: Wrapping up by adding an additional image to customize your exercise

Select an additional public domain image from Unsplash.com or a personal image to add to your exercise composition and make it uniquely your own. Don’t forget to follow Part 1 to prepare the new image for your composition!


Exercise Requirements (Assessment criteria)

Use of all images from the provided exercise images + one image of student’s choice from Unsplash.com.

Use of Layer Masks with gradients for blending

Use of Selection tool to create and fill a “window” in the composition with another image behind it.

Use of a Blending Mode on at least one layer

Use of Targeted adjustment layers to synthesize the levels of contrast throughout the entire composition.

Additional public domain image added to your exercise file to customize the final composition.

Workspace organization: Layers are labeled

A jpeg is correctly exported and included in your exercise submission


Exporting and submitting your exercise:

Export a jpeg

When you have finished Exercise 4, go to File > Export > Quick Export as JPEG

In the Save As dialogue window, navigate to you Exercise 4 folder, label your image LastName_FirstName Exercise 4.jpeg (Example: Anfinson_Erin Exercise 4.jpeg )

Next, click Save.

Compress your Exercise files and submit via the free file transfer website, WeTransfer.com

Compress or zip your Exercise 4 folder containing the original Photoshop .psd file & the exported jpeg. On a Mac, select the folder and go to File > Compress “Exercise 4 Folder.” A .zip file will be created next to the folder

Go to WeTransfer.com, upload the .zip file, type your name and “Exercise 4” in the Message box, and send it to Erin.Anfinson@mtsu.edu

Click Transfer files

You will receive a confirmation email when the transfer is downloaded

Resources and Tutorials:

Get to know the Photoshop Workspace

https://helpx.adobe.com/photoshop/how-to/ps-basics-fundamentals.html

Illustrated Recipe Pattern

Learning Objectives:

Students will demonstrate knowledge of color theory through dynamic use of monochromatic color scheme values
Students will show experimentation with line through stroke width variation
Students will improve skills in Adobe Illustrator, using workspace organization strategies


Project:

Use the skills you learned in Exercise 2 to create vector drawings of ingredients from a five-ingredient recipe of your choice. Once the ingredients are all drawn, you will use the pattern tool to create a vector pattern of your ingredients. Review the Exercise 2 demo video as needed to complete this project!


Part 1: Research & Sketches

Begin by reviewing the Project 2 Presentation and then research the work of 3 illustrators who create surface pattern designs. This is a very open ended search and I’d suggest starting by exploring the work of a variety of artists who create illustrative themed patterns on Spoonflower.com The artists I the Presentation are also a good place to start but you may use only 1 of them in your research! Write a brief reflection on the work of the artists you researched and include 2 images of his/her work in a word  document.

Select a five-ingredient recipe. For example, Pesto ingredients: Olive oil, parmesan cheese, basil, pine nuts, and garlic.

Draw sketches of all five ingredients in your sketchbook. Try to keep the drawing style simple and consistent between the ingredients.


Part 2: Document Setup in Illustrator

Scan or photograph your page of sketches as a jpeg and store it in a new Project 2 folder on your computer. Label this folder LastName_FirstName Project 2. (example: Anfinson_Erin Project 2)

On your computer, create a new Project 2 folder on your computer. Label this folder LastName_FirstName Project 2. (example: Anfinson_Erin Project 2)

Create a new, 300ppi document with one 11” x 11” art board in Illustrator.

Click Create and immediately save your file in the Project 2 folder as LastName_FirstName Project 2.ai (Example: Anfinson_Erin Project 2.ai).


Part 3 : Import your sketches and begin drawing!

Import your scanned ingredient sketches and create a template layer.

In the Layers panel, create and label new layers for each ingredient you will draw (5 total).

Begin tracing your sketches on their individual layers with the Pen (P) and/or Pencil (N) tools. Use the same drawing procedure you learned in Exercise 2, starting with the outlines of the drawings and exploring the use of a varied stroke width profiles using the Width Tool (Shift W)

 Don’t forget to double-check that you are drawing each ingredient on its own layer!

When you have the outlines for each ingredient, draw color fill shapes behind your outlines, filling them with light and dark values from a Monochromatic color harmony. When you select your key color, save it in a new Color Group! (Refer to Exercise 2).

When you are finished with your drawings, make a new 11” x 11” artboard. Next, copy and paste all of the ingredient drawings in a new layer called “Expanded Pattern Drawings” in the Layers panel. These are the copies of your drawings you will work with for the pattern.

Next, select, copy and paste all of your ingredient drawings in the Expanded Pattern Drawings layer. Keep them selected and move them to the new art board and go to Object > Expand… Make sure Stroke and Fill are checked in the Expand menu. *If Expand isn’t an option, use Expand Appearance, then go back to Object > Expand and proceed.

Save your work and follow the next steps to create a Pattern swatch.


Part 4: Create a pattern from your vectorized sketches

Watch the demo video link on D2L for instructions on how to use the Pattern tool to create a new, editable, pattern swatch. Directions are also below.

If you haven’t, watch the demo video link on D2L. There’s extra tips and even a bonus demo on Replacing color!

Hide or lock your original drawings on Artboard 1 so that you don’t accidently use them.

Arrange the copied and pasted drawings on the new 11” x 11” artboard.

Make sure the Swatches window is open in the workspace, if not, Go to Window > Swatches

Select all of the drawings with the Selection tool (V) and go to Object > Pattern > Make. The Pattern Options dialogue box will open.

Set the Pattern options to the following: 

When you arrive at a result you’re pleased with, change the “Dim Copies to:” 100% and zoom out to look at the overall resulting pattern. Make any further changes you feel are necessary.

Add a background color to your pattern by creating a rectangle the same size as your pattern tile size, 3” x 3.” You may need to use the [ and ] keys to move the rectangle behind your drawings.

Select a color from the one of the split complements of the monochromatic key color you used to fill the drawings. For example, if yellow was key hue of the drawings, violet-red or violet-blue could be a background color.

Make sure your rectangle background is centered in the pattern tile so there are no lines or gaps visible in the copies. When you are satisfied with your results, name your pattern and click Done in the upper left hand of the window. Your pattern will be saved in a new swatch.

Finally, select and hide the Expanded Pattern Drawings layer, create a new layer called “Pattern” and draw a square with the Rectangle tool (M) to fill the entire artboard. Fill it with your new ingredient pattern!

Save your work. When you are finished you will have two 11”x11” Artboards. Artboard 1 will have your drawings. Artboard 2 will be filled with your saved pattern swatch.


Project Requirements

  • Initial original project sketches completed in sketchbook by hand and scanned/photographed to use as templates
  • Five ingredient drawings vectorized in Illustrator from hand-drawn sketches
  • Dynamic use of Monochromatic color scheme values in each drawing’s fill and stroke colors
  • Stroke width variation is dynamic and not left uniform in each drawing
  • Overall effort and success in creating a consistent approach to the vectorized drawings with the drawing tools, color/value selections, and stroke width profiles. i.e.—Do the drawings look like they go together and synthesize stylistically in the pattern motif?
  • Pattern tool is used to create a pattern from the five monochromatic ingredient drawings + a background filled with a split complement color.
  • Correct artboard sizes are used
  • Workspace organization: All drawings are labeled and create on their own independent layers

Exporting and submitting your exercise:

When you have finished Project 2, go to File > Save As…

Next, select Adobe PDF from the format options.

In the next window, make sure “Preserve Illustrator Editing Capabilities” is checked!

Click Save PDF. Be sure you file is labeled correctly! LastName_FirstName Project 2.pdf (Example: Anfinson_Erin Project 2.pdf)

Submit the exported PDF of your completed Project 2 file in the class D2L Dropbox

Ready to learn more? Check out this online this demo by Irene Demetri for a more in-depth look at the Pattern tool in Illustrator.

Digital Notan

Student Work Example: Lauren Hunsicker

Learning Objectives:

Students will demonstrate proficiency with Adobe Illustrator shape modification tools
Students will show understanding of figure/ground relationships


Notes:

Notan
Japanese design concept that focuses on the harmonious arrangement of light and dark in a composition.

Figures on Ground


This illustration is an example of white figures on a black ground.

The white key figures have the most visual weight in the composition and are not interacting with the ground.

Maintaining a 50/50 visual balance between figure and ground is key to your Notan design.

Notan Square Expansion

Student Example: Abby Wiencek

In the Notan Square Expansion exercise, the goal is to maintain a “dichotomy of attention,” or a 50/50 balance between the figures and the ground in the design.

This balance is created by cutting shapes from the inside of the the square and reflecting them along the axis of and outside edge. Of the square.

Your design can be symmetrical or asymmetrical.

If you don’t add or take anything away, your result will  always be a 50/50 balance.

Notan Design Rule 1:

Julie Rowan-Zoch


You can only use black and white.

Notan Design Rule 2:

Student Example: Lauren Hunsicker

You must have a theme. This student’s theme was hockey.

Notan Design Rule 3:

No cut shapes can be deleted or added. Look carefully at this example and notice how every shape is reflected across the design. Your goal is to “destroy” the square and create a “dichotomy of attention” between the white and black shapes.

Notan Design Rule 4:

Every shape that is cut from the interior must be reflected equidistantly across the axis line of the nearest edge from which it was cut.

Notan Design Rule 5:

You must explore 2 levels of expansion outward and/or back inward to increase the complexity and interest of your design. Varying scales of shapes will help you achieve this.

Student Example: Laura Scully
James McNeill Whistler, 1864, Symphony in White No. 2: The Little White Girl, Oil on Canvas
Composition study from MitchAlbala.com


Read more about Notan in composition at artist,
Mitchell Alba’s website.


Getting started
• Complete Exercise 1 BEFORE starting Project 1 to learn the tools.
• Complete the required sketches before beginning in Illustrator
• Carefully review the project sheet to make sure you fulfill all requirements and read over important project tips.
• Contact Erin at Erin.Anfinson@mtsu.edu with any questions.


Project:

Use the skills you learned in Exercise 1 to create a complex square expansion composition that illustrates the Japanese dark-light principle of design, Notan. Through the composition process you will improve your skills with the shape modification tools in Adobe Illustrator. Review the Exercise 1 demo video as needed to complete this project!

The primary rule is to reflect each and every shape you cut on the opposite side of its axis along the square edge. You cannot add or delete any extra shapes to the composition.

Step 1: Project research, sketches, and document set up

Review the Project 1 Presentation on D2L.

Select a theme for Notan design. Something simple—outer space, the ocean, flowers, sports, tools, etc…

Complete 3 different black and white drawings in your sketchbook to generate ideas for possible themed shapes and the overall expanded square layout of your design. Submit jpegs of your sketches to the D2L Dropbox with the project by on due date.

On your computer, create a new Project 1 folder on your computer. Label this folder LastName_FirstName Project 1. (example: Anfinson_Erin Project 1)

Create a new, 300ppi, 11” x 11” document in Illustrator and draw a 6”x6” black filled square in the center of the page (no stroke).

Click Create and immediately save your file in the Project 1 folder as LastName_FirstName Project 1.ai (Example: Anfinson_Erin Project 1.ai).

Step 2: Develop your Digital Notan design from your sketches

Use the pencil, shape and/or pen tools to create united shapes inside the edges of the black square. Use the Divide pathfinder tool and the Reflect tool to reflect your cut-out shapes along the axis line of the edge of your square.

Continue cutting, reflecting, and expanding your square with themed shapes a minimum of 2 levels outward and/or inward until you achieve a “dichotomy of attention” between the  black and white positive and negative spaces. 

TIP: The goal is to “destroy” the dominant shape square. Start with large, bold cutouts first, medium-sized shapes 2nd, and smaller detailed, descriptive cutouts last in the expansions.

Step 3: Wrap up your design with grouping and a custom border

When you are finished with your design, select all of your shapes and Group the together.

Center your design in the center of your artboard

Look at the overall size in the Transform window (Window > Transform) and write this size down.

Next, Resize your artboard to proportionately fit your design with a 1 1/2” border on all sides. 

Example: if the final grouped design is 8”x4”, add 3” to each side and your artboard should be 11”x7”


Project Requirements (Assessment Criteria)

Noticeable theme is present in the design

Minimum of 2 levels of shape expansion beyond the original square

Proficiency with shape and pathfinding tools is evident in the complexity of the drawn and cut shapes.

Assignment “Rules” were followed. Any and all cut shapes are reflected across their access lines. No shapes are added or deleted.

Use of black color to fill all shapes (No visible strokes)

Achievement of a balance of “dichotomy of attention” between the black and white space in the design

The original square is successfully destroyed

Final design is grouped and centered on the artboard

Final design is correctly framed with a 1 ½” in border on all four sides


Exporting and submitting your exercise:

When you have finished Project 1, go to File > Save As…

Next, select Adobe PDF from the format options.

In the next window, make sure “Preserve Illustrator Editing Capabilities” is checked!

Click Save PDF. Be sure you file is labeled correctly! LastName_FirstName Project 1.pdf (Example: Anfinson_Erin Project 1.pdf)

Don’t forget to also upload a Jpeg of your sketches!

Submit the PDF of your completed Project 1 file in the class D2L Dropbox

Dada Digital College

Project 3: Dada Digital Collage / MT Engage Signature Assignment

Hannah Hoch

Learning Objectives:

Students will develop a strong collage composition using Photoshop tools that mimics the look of traditional cut-paper collage.
Students will explore contemporary themes through Dadaist absurdity
Students will demonstrate mastery of incorporating scanned images into the Photoshop workspace
Students will show creative use of digital cutting tools and non-destructive editing techniques


Notes and Examples:

Dada Art Movement

  • Founded in 1916 in war-neutral Zurich, Switzerland
  • Group of artists, writers, musicians, etc.
  • Founded as a reaction to WWI (1914-18).
  • Artists demonstrated their revulsion of nationalism and materialistic values. Believed that bourgeois capitalism and materialism had led people to war.
  • No coherent style, but works’ aesthetic was marked with a mockery of materialism and nationalism and embraced chaos and irrationality.
  • Intended to offend.

Dada artist Hans Richter

“Our provocations… were only a means of arousing the bourgeoisie to rage, and through rage to a shamefaced self-awareness… Dada was a storm that broke over the world of art as the war did over the nations.. it was an artistic revolt against art.”

Collage & Photomontage

Raoul Hausmann
  • 2 art techniques developed out of Dada
  • Used photographic imagery from life
  • Used paper ephemera from life
    – Transportation tickets
    – Maps
    – Receipts
    – Etc. Brainstorm contemporary examples…Digital ephemera?
Raoul Hausmann, Tatlin Lebt Zuhause, 1920
Raoul Hausmann, The Art Critic, 1920
Hannah Hoch, Cut with the Kitchen Knife, 1919
Hannah Hoch
Hannah Hoch
Hannah Hoch
Hannah Hoch

Contemporary Collage Artist Examples

Ben Lewis Giles
Ben Lewis Giles
Jesse Treece
Jesse Treece
Wangechi Mutu
Sean Hillen
Sean Hillen
Peter Kennard
Hollie Chastain

Student Examples

Tabitha Camargo
Theme: Mental Health
Chelsea Gardiner
Theme: Genetic Food Modification
Maddie Harlin
Theme: Internet Privacy
Jon Norris
Theme: Access
Seth Graham
Theme: Pollution / Climate Change
Justin Herndon
Theme: Pollution
Jackie Nguyen
Theme: Body Image
Lauren Scully
Theme: Pollution

Getting Started

  • Complete Exercise 3 BEFORE starting Project 3 to learn the tools.
  • Complete the artist research and required sketches before beginning in Photoshop
  • Carefully review the project sheet to make sure you fulfill all requirements and  read over important project tips.
  • Contact Erin at Erin.Anfinson@mtsu.edu with any questions.

Project:

Utilize the tools and techniques you learned in Exercise 3 to create a 8”x10” Dada-inspired digital collage. Think about a contemporary theme (social, environmental, political, etc.) that you feel strongly about to use as your subject matter and explore through the Dadaist lens of absurdity. Look for images and materials to digitally “cut and paste” together in a composition that embodies the Dada movement and mimics the look of cut paper. No translucency or blending is allowed in your collage layers.   

Step 1: Project Research & Sketches

Written research (Prepare in a Word Doc):

Review the Project 3 PowerPoint on D2L and the Dada overview at the Museum of Modern Art’s website.

Research and write about of the work of 3 different Dada or other collage/photomontage artists from the project PP and write a brief reflection about what aspects of each artists’ work you might utilize in your collage. Copy and paste 2 images of each artists’ work along with your written reflections in a Word document.

In the same Word document, write a brief reflection about a contemporary theme you will explore in your project and what subject matter (collaged imagery) you will use to illustrate that theme. Any theme (social, political, environmental, technological, etc.) can be explored through the Dada lens of absurdity! Pick something you are really engaged with!

Sketches:

Prepare 2 different composition sketches (6 ½” x 8” each) in your sketchbook. Portrait or landscape orientation is ok.

Turn in your project research and sketches to the D2L Dropbox by the due date.

Step 2: Digital Collage material requirements

Source your digital collage materials for all collage and background layers from the following:

Public domain online sources. Refer to the in the Project Tips section for guidance.

Scan/Photograph your own collage elements from real life paper ephemera

Other non-public domain sources can be used as long as you consider how transformative the change you are applying to the image are in your final collage. Refer to the Copyright, Image Appropriation and Fair Use presentation on D2L for guidance.

Step 3: Photoshop document set up

Create a new Project 3 folder on your computer. Label this folder LastName_FirstName Project 3. (example: Anfinson_Erin Project 3)

Create a new Photoshop file with the following specifications for your collage:

8”x10” (2400 pixels x 3000 pixels) for Portrait orientation or 10”x 8” (3000 pixels x 2400 pixels) for Landscape orientation

300ppi resolution

Save as LastName_FirstName Project 3.psd (example: Anfinson_Erin Project 3.psd

Step 4: Start your collage!

Following your research and image collection, start creating your Dada digital collage! Be sure to have a first draft ready for the in-progress critique on the D2L Discussion board.


Project Requirements (Assessment Criteria)

  • Evidence of composition theme and it’s relevant connection to Dada movement
  • Effective composition. Is the tension and sense of absurdity heightened in your composition through the use of: Repetition, Scale changes, Placement, Proximity, Positive/Negative Space and/or Color choices?
  • Use of all required types of collage materials (See requirements above)
  • Collage materials are scanned and/or imported at the correct resolution for the final print document (300ppi)
  • Follow the assignment “rules”
  • No use of Transparency. Mimic the cut-paper look with opaque layers.
  • No use of Distortion (stretching) of images
  • Images only, no Photoshop Text layers, Use of text is only permitted if it is incidental and inherently part of your found collage materials
  • Creative use of digital cutting tools to non-destructively mask scanned digital collage layers to create a complex composition. Are interesting connections forged between combined layers? Are there holes cut to reveal unexpected images or layers below?
  • Creative use of Adjustment layers or clipped adjustment layers where needed to harmonize color, brighten/darken, and/or or make the collage elements more effective in the composition.
  • Workspace organization: Labeling layers, etc.

Completion of Project 3 Self-Reflection & MT Engage Signature project ePortfolio requirements


Exporting and submitting your Project:

Export a jpeg

When you have finished Project 3, go to File > Export > Quick Export as JPEG

In the Save As dialogue window, navigate to you Project 3 folder, label your image LastName_FirstName Project 3.jpeg (Example: Anfinson_Erin Project 3.jpeg )

Next, click Save.

Compress your Exercise files and submit via the free file transfer website, WeTransfer.com

Compress or zip your Project 3 folder containing the original Photoshop .psd file & the exported jpeg. On a Mac, select the folder and go to File > Compress “Project 3 Folder.” A .zip file will be created next to the folder

Go to WeTransfer.com, upload the .zip file, type your name and “Project 3” in the Message box, and send it to Erin.Anfinson@mtsu.edu


Project Tips & Resources!

Scanning Tips:

TIP: Use this handy online calculator for help with Inches Transfer Pixel calculations when you are evaluating your scanned and downloaded collage materials to determine their 100% scale in your final 8”x10” 300ppi Photoshop file.

For example: If you scan in a 2”x 2” piece of material at 300dpi, you cannot increase the scale of it in your composition without pixilation. Instead, scan the 2”x 2” material at 600dpi and you can scale it up to 4”x4” in your composition.

Redistribute pixels of downloaded digital images:

Open up each of your found/downloaded Public Domain images & your scanned images to redistribute the pixels to a 300ppi resolution BEFORE copying and pasting them into your 8”x10” composition. As soon as you redistribute the pixels, you will know if they are large enough for your purposes in the final collage file.

Public Domain image resources:

Regardless of what source of imagery you use, remember your appropriation images into your own work should be transformative from the original image to justify it as Fair Use.

Walker Library: Click on the Image Sources tab for links to a number of resources!

Smithsonian Open Access Collection

Metropolitan Museum of Art Open Access collection

Pexels.com

Unsplash.com

Pixabay.com

Creative Commons For CC licensed works, be sure to check what KIND of Creative Commons license is assigned to the image.

Blended Realities

Jerry Uelsmann, The Myth of the Tree

Description & Objectives:

Photograph a portrait of yourself or someone else (no selfies!) and transform it into a Black & White surrealistic environment by compositing it with found imagery in Photoshop. Use Blending Modes, Layer Masks, Gradient Layer Masks and Adjustment Layers in Photoshop as necessary to create a space that is dream-like and surrealistic. Your goal is to make the compositing as least obvious as you can. It will help to brainstorm a visual story you’d like to tell about your composited portrait, but a specific narrative is not required.


Artists to Research:

Henry Peach Robinson, Georges Melies (early filmmaker), Jerry Uelsmann, John Brosio (painter), Erik Johannsen, Gregory Crewdson

Notes and Examples:

Early image compositing

  • Image compositing and blending began in the mid 1800’s
  • An early pioneer was British pictorial photographer, Henry Peach Robinson
  • Robinson was best known for mastering the technique of printing multiple negatives into a single image to create a new narrative.
  • This technique blurred the boundaries of painting and photography

Contemporary Examples

Practical Uses for Digital Image Compositing

  • Sketches for site-specific sculpture or installations
  • Visualization for professional creative opportunity proposals like gallery installations,  client proposals, or mural projects. (For example: digitally composite an image of a mural sketch on a photo of the wall where you’re proposing to paint it!)

Student Examples

Getting Started

  • Complete Exercise 4 BEFORE starting project 4 to learn the tools.
  • Complete the artist research and required sketches before beginning in Photoshop
  • Carefully review the project sheet to make sure you fulfill all requirements and  read over important project tips.
  • Contact Erin at Erin.Anfinson@mtsu.edu with any questions.

Project:

Project Research Requirements (Prepare in a Word Doc)

Watch the required 5-minute video on D2L about Jerry Uelsmann.  Research and write brief reflections about Uelsmann’s work and the work of either 2 additional artists from the list mentioned above or 2 other surrealist photographers whose work you are interested in. In your written response be sure to address what aspects of each artists’ work that you might explore in your own project. Copy and paste 2 images of each artists’ work, along with your reflections, into a Word document.

In the same Word document, write a brief proposal about your idea for the project. Who will be in your portrait? What surrealistic narrative will you tell? What kind of imagery will you blend with your portrait to tell a story?

Create a B&W sketch of your composited photo composition idea in your sketchbook. Take a well-lit photo of your sketch to submit it in the D2L Dropbox with your written research.

Upload your completed research to the class D2L Dropbox by the due date.


Tips for success:

Plan from your sketch and INTENTIONALLY photograph your portrait with the end result in mind. Use your sketch to plan the portrait pose. Good lighting is extremely important. Have your subject pose near a window, outside, or with good interior lighting.

Structure your process. Begin with the largest blended areas of your composition, and then  move on to smaller blended areas and details/embellishments.

Utilize the power of adjustment layers, to match your varied imagery.


Project Document Specification Requirements:

Photoshop Document 8″x10,” RGB color space, 300 dpi (Pixel Dimension 2400px x 3000px)


Project Material Requirements:

You must use the following for your composition:

Photographed portrait of yourself or someone else

Public Domain and/or other personally photographed imagery to composite from one of the sources at library.mtsu.edu/art/images or Unsplash.com

Successful projects will demonstrate and be graded on the following:

Final composited image should be Black & White (Desaturate your source images before pasting into your project)

Effective composition and effort to find interesting visual connections between the blended imagery (Formal elements of art and principles of design)

Creation of a successful surrealistic narrative (Content & Subject Matter)

Technical quality of the work

Photo composite materials are imported at the correct resolution (300ppi)      

Effective image blending through the use of Blending Modes, Layer Masks with Gradients, etc. i.e. How well does your composition fool the eye?

Effective use of Adjustment Layers and Adjustment layer masks to harmonize varied image sources where needed (brightness/contrast, levels, etc.)

Use at least 5 blended images that are from high quality image sources (personal + public domain)

Organization of your Photoshop workspace layers, etc.


Project Submission Requirements:

Label your file LastName_FirstName_BlendedRealities.psd

Submit your Photoshop file (.psd) via WeTransfer.com to Erin.Anfinson@mtsu.edu  

D2L ePortfolio Project Self-Reflections

Export a 600pixel-wide Jpeg of your project file and upload it to the Project 3 self-reflection page in the class ePortfolio (Export demo video on our class D2L site in the ePortfolio section)

Complete the written self-reflection exercise in your ePortfolio by the due date. Questions are available on the class D2L site in the Project 4 folder. Copy and paste these questions into the appropriate text box in the ePortfolio template.

Label your file LastName_FirstName_BlendedRealities.psd

Submit your Photoshop file (.psd) via WeTransfer.com to Erin.Anfinson@mtsu.edu  


D2L ePortfolio Project Self-Reflections

Export a 600pixel-wide Jpeg of your project file and upload it to the Project 3 self-reflection page in the class ePortfolio (Export demo video on our class D2L site in the ePortfolio section)

Complete the written self-reflection exercise in your ePortfolio by the due date. Questions are available on the class D2L site in the Project 4 folder. Copy and paste these questions into the appropriate text box in the ePortfolio template.

Animated Chain Reaction Machine

The comic artist, Rube Goldberg, is the only person ever to be listed in the Merriam Webster Dictionary as an adjective. … A Rube Goldberg Machine is “a comically involved, complicated invention, laboriously contrived to perform a simple operation” (Webster’s New World Dictionary).


Project Description & Objectives

Create a 10 second animation of an Rube Goldberg Machine of your own design with a total of 3 chain reactions. The elements and composition of your machine will be created in Adobe Illustrator using the sketches as a template. All drawn elements of you final machine composition will utilize an analogous color scheme.

Minimum action sequence requirements:

Action 1 causes Action 2 to begin

Action 2 causes Action 3 to begin

Action 3 causes the final result of the machine.

TIP! Design your composition backward. What is the end action? Turning on a light switch? Starting a fan? Etc. Start at the end and use your imagination to work your way 3 ridiculous steps backward.


Notes

Rube Goldberg:

•RUBE GOLDBERG (1883-1970) was a cartoonist, an inventor, and the only person ever to be listed in Merriam-Webster’s Dictionary as an adjective. •Of the nearly 50,000 cartoons he drew in his lifetime, Rube is best known for the zany contraptions of Professor Butts. These inventions, also known as Rube Goldberg Machines, solved a simple task in the most overcomplicated, inefficient, and hilarious way possible

•Rube Goldberg lives on in pop culture and is referenced daily in both print and digital media. His name is searchable, hash-taggable, and at best viral. But nowhere is his legacy more celebrated than through the competitions that bear his name.

This Too Shall Pass
2017
OK Go music video
Drawings of over-complicated machines to accomplish simple tasks.

Visit this link to see more examples of comics:

https://www.rubegoldberg.com/image-gallery-licensing/

Contemporary Examples

Source:
https://nothingsuspicio.us/comic/0019-rube-goldberg
Source:
https://patrick-dias.com/rube-goldberg-editorial-piece
Source:
https://www.behance.net/gallery/22700215/Rube-Goldberg-Machine-Infography
Christoph Niemann

“The whole idea of a machine is outdated,” Christoph Niemann says about “Coffee Break,” his cover for this week’s issue. “I started drawing beakers and pipes, a cartoon of a machine,” he continues. “But then I decided to update the outdated technology. I put things like a Death Star, a SyQuest drive (it had a translucent case so you actually saw the disk inside, and it always made this very peculiar sound, chk chk chk chk chk), a razr flip phone (I just remember that being the hottest thing), and a ZX81. Starting at the coffee cup, you go up to the round thing, then you go left where there’s a big cog, and to the left of that there’s something that looks a bit like a typewriter–that’s the Sinclair ZX81. That was my first computer, back in maybe 1984 or ’85. It was super lightweight: you could program three lines of code and that was that. It didn’t have a monitor—you used your TV. And when you unplugged it, everything was gone because it didn’t have any way to store anything. I just loved it. I have a romantic attachment to these things—I wanted to anoint them into cartoon heaven.”

Read about this work at:
https://www.saatchiart.com/art/Collage-Dentist-Recommended/924696/3725036/view
Julia Geiser
Source:
https://julia-geiser.ch
Terry Gillam

*Terry Gilliam was the animator for the Monty Python’s Flying Circus tv series (1969 – 1974). These animations were created with cut paper and stop motion. Not all of the animations are cause and effect but they may give you some inspiration for a collage-based project.

Getting Started

  • Complete Exercise 4.1 & 4.2 BEFORE starting Project 4 to learn the tools.
  • Complete the artist research and required sketches
  • Carefully review the project sheet to make sure you fulfill all requirements and  read over important project tips.
  • Contact Erin at Erin.Anfinson@mtsu.edu with any questions.

Project:

Step 1: Project Research & Sketches

Review the Project 5 Power Point on D2L

Watch the required 5-minute video on D2L about Rube Goldberg. 

Research and a write brief reflections about Goldberg’s work and 2 contemporary examples of chain reaction videos, illustrations or other artwork you research from the Power Point. In your written response be sure to address what aspects of each artists’ work that you want explore in your own animated project. Copy and paste 2 images of each artists’ work or links to videos, along with your reflections, into a Word document.

In the same Word document, write a brief proposal about your idea for the project. What simple and mundane task will you create a comically complex series of 3 chain reactions to accomplish? Write a list and brief explanation for each reaction in the chain.

Create a sketch of your idea, including directional arrows and notes about the chain reactions you plan. Take a photo of your sketch to submit it in the D2L Dropbox with your written research.

Submit your completed research to the class D2L Dropbox by the due date.

Step 2:  Illustrator document set up

Create a new Project 5 Asset folder on your computer. Label this folder LastName_FirstName Project 5. (example: Anfinson_Erin Project 5)

Create a new Illustrator document with the following size specifications for your collage:

Save as LastName_FirstName Project 5.psd (example: Anfinson_Erin Project 5.psd

RGB Color Space

72ppi resolution (for screens)

Height: must be 1080 pixels

Width: between 1080 pixels – 1920 pixels. Select a size proportionate to your composition sketch. For example: Your sketch on paper is 8 ½” x 11” then Illustrator artboard would be 834 pixels x 1080 pixels. To solve, cross multiply and divide the proportions to solve for the missing pixel width dimension using this online calculator by inchcalculator.com.

Step 3:  Draw your machine in Illustrator

Using your scanned sketch/map as your guide, re-draw your Rube Goldberg machine background and elements in Illustrator.

Remember to carefully label and draw each element on your machine that is to be animated on separate layers!

Draw your machine elements like puppets with separate moving parts, if necessary.

Use an Analogous color harmony for your entire composition. Select 1 key color from the harmony and use the secondary colors as accents. Remember to fully utilize the light/dark values from each color!

Zevendesign.com

Step 4: Import the Illustrator document into After Effects and animate your machine!

Follow the same procedure in Exercise 4.1 to import your Illustrator drawing into an After Effects composition.

Where necessary for animated scale change, motion paths, and/or rotations, remember to move the anchor points using the Anchor Point tool (Y) before you begin animating! 

Animate the cause and effect actions of your machine in a 10 – 15 second animation. To change the duration of your animation on the timeline, go to Composition Settings (Command K) and reset the duration in the dialogue box.


Project Requirements (Assessment Criteria)

Machine Illustrator drawing and composition:

Overall composition effectiveness. Placement of machine parts, consideration for background elements, etc.

Effectiveness of the applied analogous color harmony

Overall stylistic consistency and approach to the machine drawing. i.e. Are the drawings tied together visually through the use of color, stroke, style, line width variation, etc?

3 total reactions must be animated:

Action 1 causes action 2 to start

Action 2 causes action 3 to start

Action 3 causes the final result of your machine (i.e. the completion of the mundane task)

Required animation techniques:

Anchor points of individual animated layers are moved to more effective placements for animated motion, scale change, and/or rotation

Use of animated motion paths with curved paths where necessary

At least 1 instances of animated rotation

At least 1 instance of animated scale change

1 use of a Parented layer (Can leave another object behind using the Split layer command (review from Exercise 4.2))

Keyframe Easing used to improve the motion on all keyframed layers (easing in/out)

Effort to explore a variety of timing and speed throughout the chain of reactions through the distance of keyframed events as related to the Principles of Animation.

Workspace organization: Labeling layers, etc.

Completion of Project 5 Self-Reflection


Exporting and submitting your Project:

Export a looping .gif of your animation with Photoshop

Export a high quality .mov file from After Effects

In After Effects, go to Composition > Add to Render Queue

In the Queue window, open the Format dropdown menu and set to Lossless. Click on Lossless.

In Output, click on your file and navigate to your Project 5 Asset folder to save the export.

Click the Render button to render. A .mov version of your animation will be saved.

Use Photoshop to export a looping animated GIF of your animation

Open Photoshop, then open your .mov animation

Go to File>Export>Save for Web (Legacy)…

In the new dialogue box change the Preset to 128 Dither and make sure looping is set to Forever.

Hit Save and save your exported GIF to your Project 5 Asset folder.

Compress your Project 5 Asset folder and submit your project via WeTransfer.com:

Go to your Exercise 4.1 Asset  folder containing all of the following:

Project 5 Illustrator .ai file

Project 5 After Effects .aep file

Exported .mov

Exported animated .gif

Any and all included sound effects files (if used)

Right-click, Control-click, or go to File > Compress to compress or zip the folder

A .zip file will be created next to the folder

Go to WeTransfer.com, upload the .zip file, type your name and “Project 5” in the Message box, and send it to Erin.Anfinson@mtsu.edu