Category Archives: 3D Design

Volumetric Line

Learning Objectives

  1. Students will be able to demonstrate fine craftsmanship, an intense and investigative approach to materials and rigorous conceptual thought.
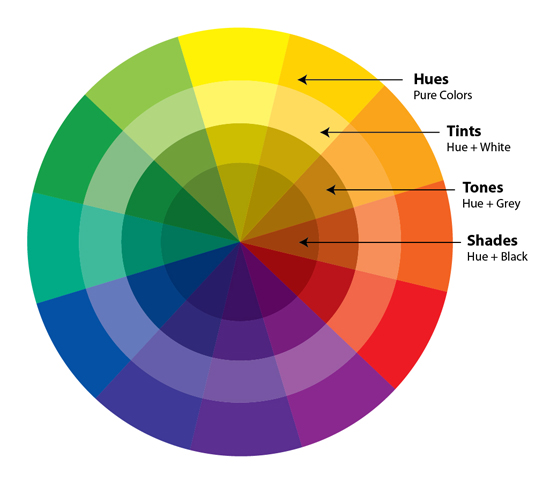
  2. Students will be able to articulate their understanding of the Elements and Principles of Design, particularly the element of line.

Info

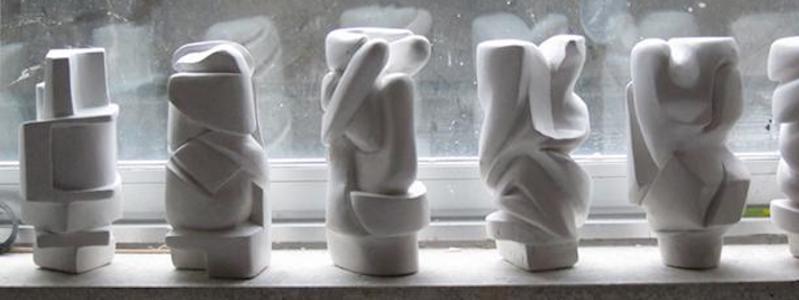
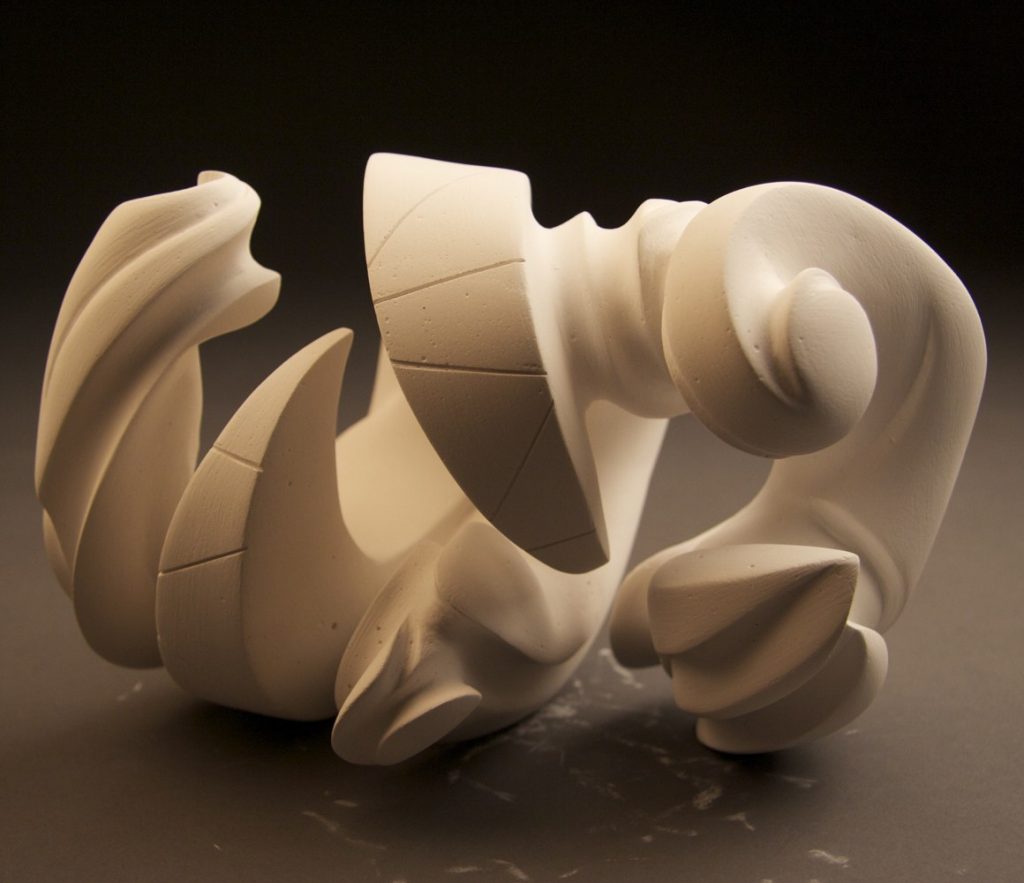
For this project you will create an outdoor sculpture that uses line to engage the viewer, disrupt the space, challenge how space is perceived and change the understanding of how space works. The word “line” is intentionally left vague. Your sculpture should be linear. It should define space or volume. It should engage the viewer. It should be dynamic. It should not be boring.

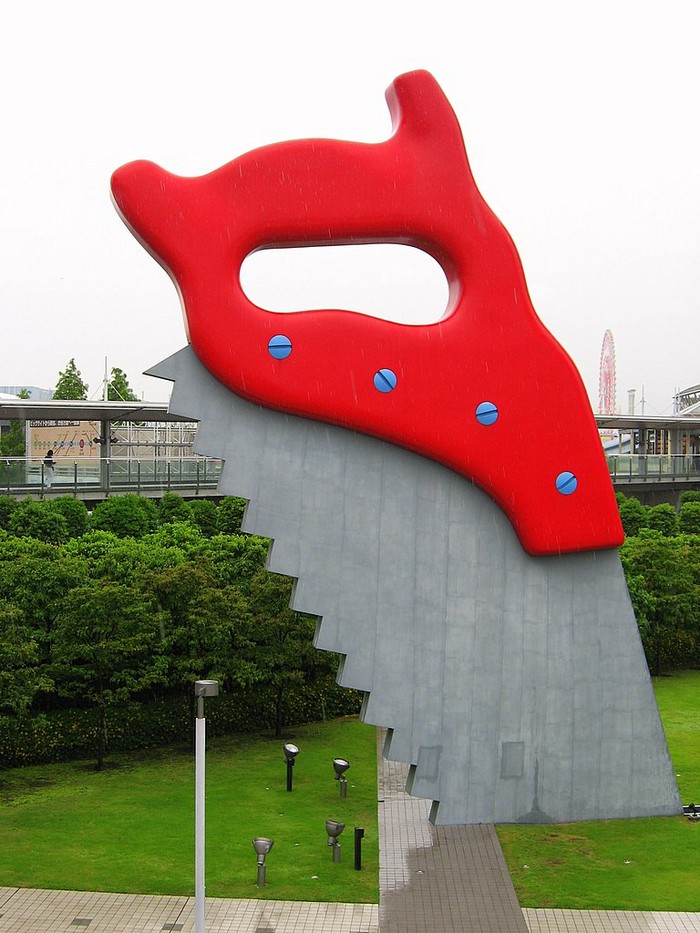
Works of art that exist outside of the gallery space offer new opportunities to engage the public with questions about space and how we interact with those spaces.

This is also an opportunity for students to expand upon a materials given use; how much can you do to pvc pipe before it is unrecognizable as simple plumbing equipment?

Materials

  • Materials to be chosen based on your project and with input from the instructor.

Sketchbook Mini-Assignments

  1. Read through Overview on Earth Art and take notes in your sketchbook. What possibilities exist when an artist moves outside of the white walls of a gallery?
  2. Read through this guide from the Boise City Dept. of Arts and History. It is exhaustive but gives an excellent overview of the numerous considerations that must be given when creating public works of art. Take notes in your sketchbook. What things were you not aware of before reading the guide?
  3. Work out at least 5 different ideas in your sketchbook. You may want to photograph various sites on campus, print those photos and then draw on top of them to get an idea of scale. Bring these photos to our first class meeting to discuss with he group.
  4. Visit the dollar store, Home Depot or Lowes to find potential materials for your project. You may also want to visit Goodwill, the Samaritan Center or the Free section on Craigslist and Facebook Marketplace. Take photos and notes of materials that you find. If you find an abundance of something but you don’t want to use it, share it with the class. Someone else might be able to use it in their project.

Project

  1. For this project you will be creating an outdoor sculpture that addresses our understanding of space through the use of line. You are being asked to challenge our assumptions of how we interact or engage with space using basic linear elements. How can you use an element that is, for the most part, two dimensional to change our understanding or engagement with three dimensional space?
  2. Come to class having completed the Sketchbook Mini-Assignments, particularly #4 where you are asked to go looking for materials. You must come to class with some idea of the materials you plan on using.
  3. During class we will take a walk around campus to discuss different sites and the potential work that could be created in those sites. Take lots of photos – make lots of sketches.
  4. As a group we will go through each idea and offer feedback, ideas, solutions and potential problems. Use this time as a space to pick your colleague’s brains about your idea.
  5. Once you have fully sketched out your ideas and worked out a timeline, discuss with your professor. Come with several ideas for materials and locations in case one doesn’t work out.
  6. Make sure to think of safety and accessibility. No work can impede the use of stairs, walkways, or doors. Think about the weather, sunset and sunrise. How will the environment affect your work? If it rains, what will happen? If there is a strong gust of wind? If someone climbs on it?

Research

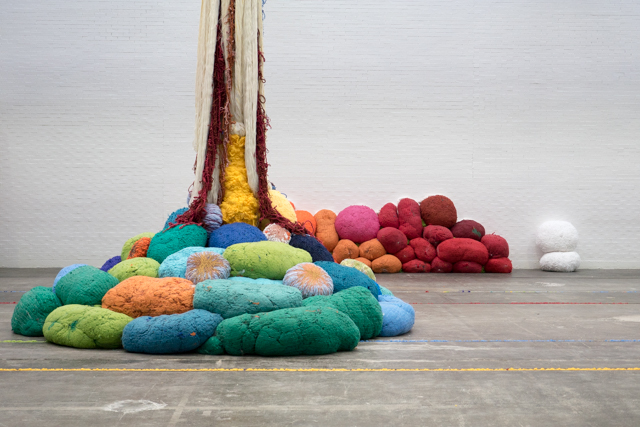
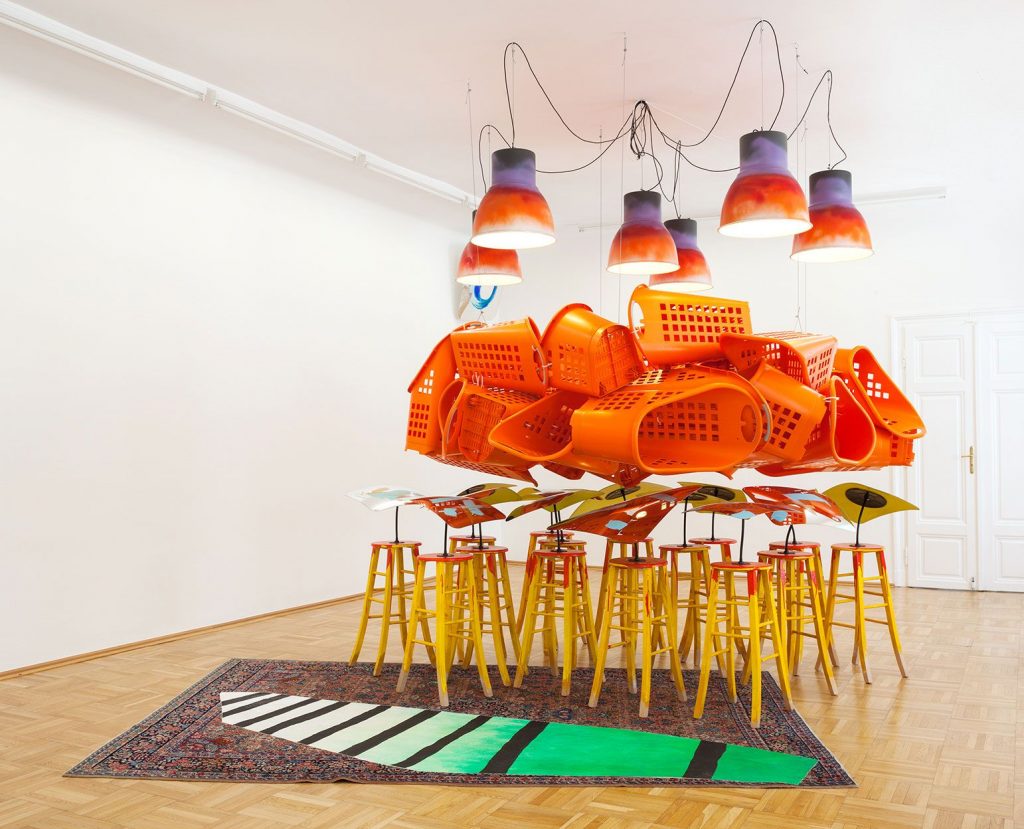
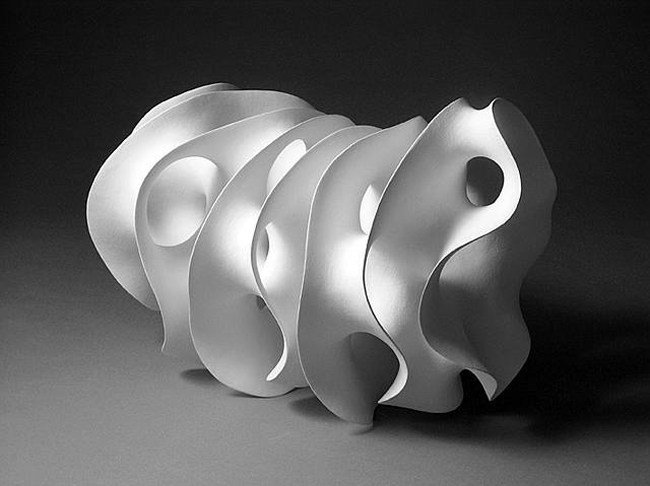
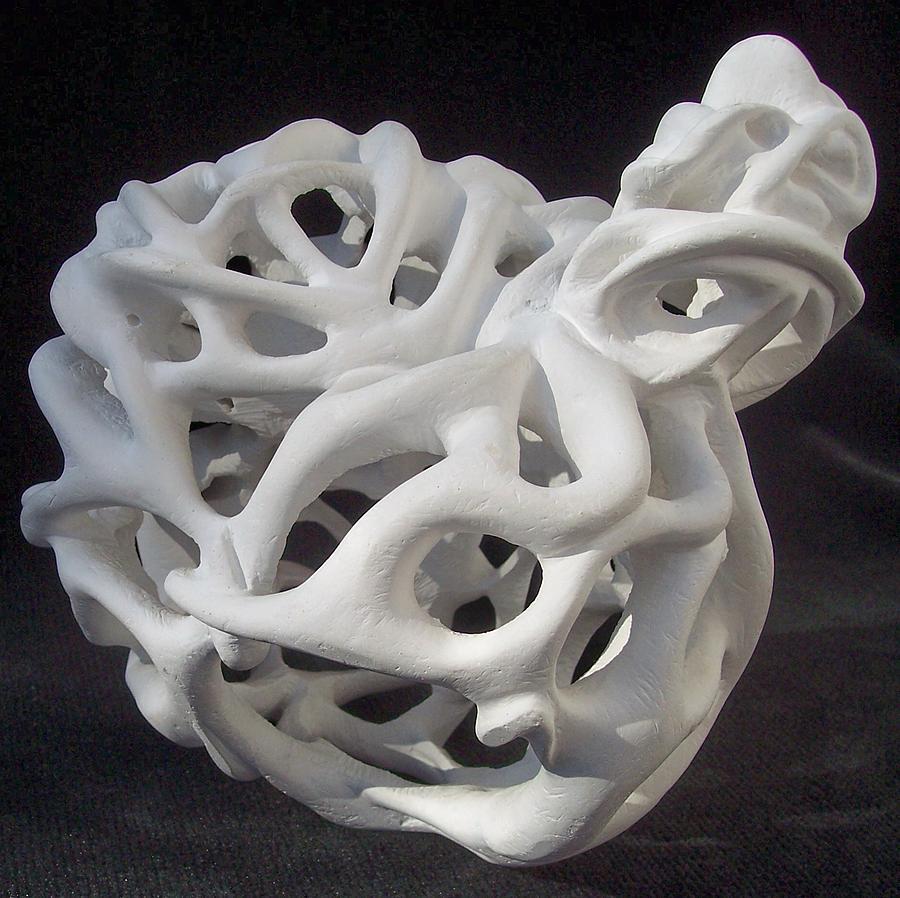
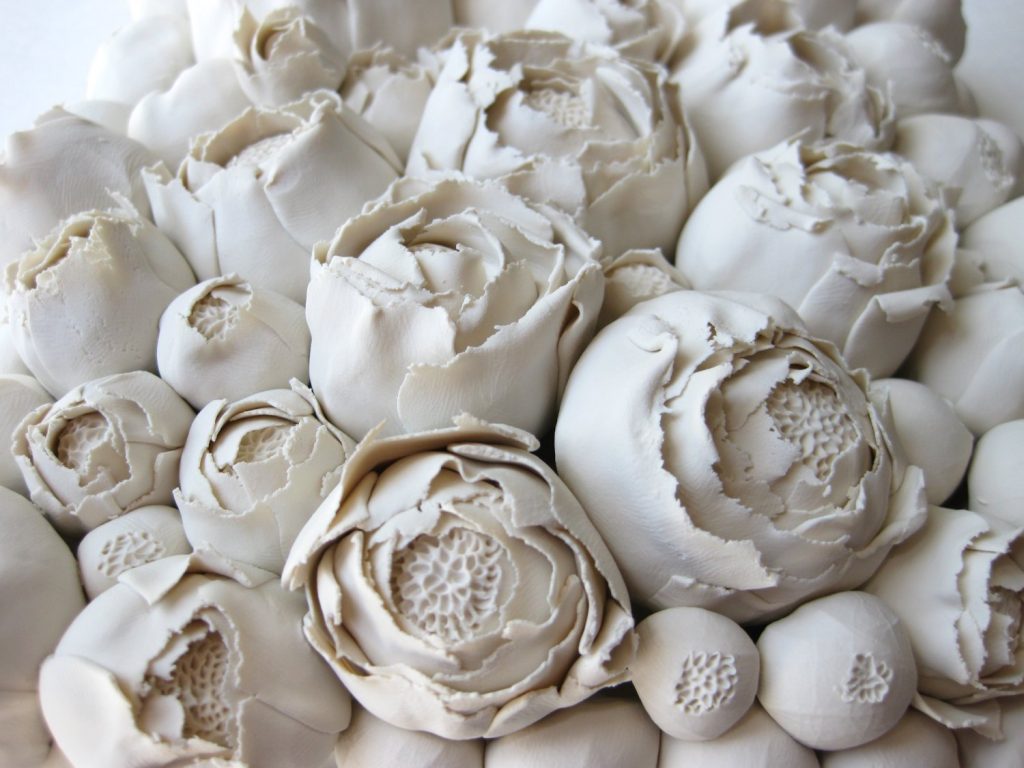
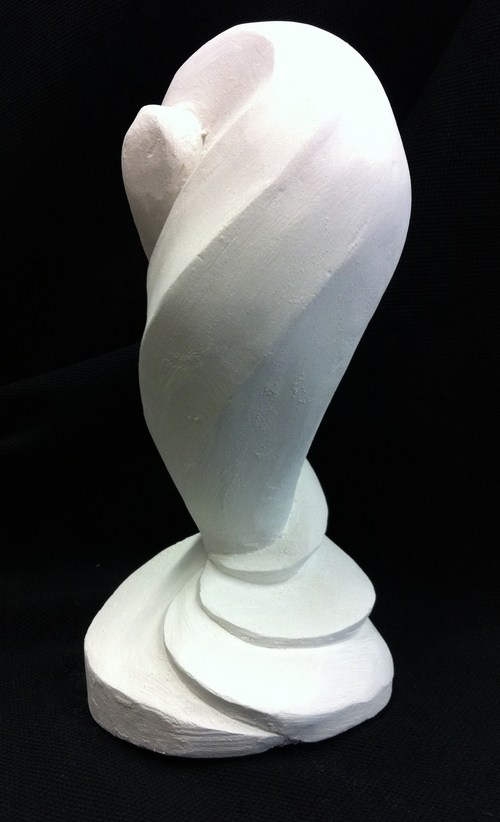
Artists: Fred Sandback, Olafur Eliasson’s Ice Watch, Steve Lambert’s Capitalism Works for Me! (True/False), Ai WeiWei’s public worksKako Ueda, Jim Lambie, Cornelia Parker, Andy Goldsworthy, Sol Lewitt, Gavin Worth, Rikuo Ueda, Christo and Jeanne-Claude

Dollar Store Principles

Learning Objectives:

  • Students will be able to demonstrate an understanding of the Elements and Principles of Design and their implementation.

Materials:

  • Dollar Store item or items that can be purchased in bulk (avoid army men, string or melted crayons.) 
  • Any additional materials you may need such as hot glue, tape, pins, etc.

Sketchbook Mini-Assignments:

  1. Look at each of the artists linked below in the research section. Take note of any works or artists you find particularly interesting. What draws you to their work?
  2. Read the Art21 interview with Jessica Stockholder before coming to class. What do respond to in the article?
  3. Make sure you have read through and understand the Elements and Principles Handout. You may also want to read through the notes and watch the videos on the Elements and Principles webpage.

Info:

One of the best ways to understand why a particular work of art is working aesthetically or not is through an understanding of the Elements and Principles of Design. The Elements and Principles for the backbone of good aesthetics (how something look) and can often be used to help solve problems you may have with a work.

In this assignment you will be given a material that is typically not thought of as an art material. You will be asked to use take element of art and illustrate a principle with your given material. This is meant to challenge you and make you question your assumptions about material use. Don’t let your brain get in the way just yet. Try everything and then decide what works best.

Composition:

Composition is defined as the arrangement of the elements and principles of design. How do we make paintings, sculptures, websites, clothing, posters, movies, photographs visually attractive?  How do we immediately know that the pants we picked out don’t match the shirt we want to wear?  How do we know that one car has a better design than the next car.  Those ideas, also known as aesthetics, are all dealing with composition.  As art students we need to understand what creates good, well organized compositions and the problems we can run into with bad or disorganized compositions.  Although introductory courses such as 2D Design and Drawing 1 will stress that you understand and use good design and composition, there are many artists who, once they understand the rules of design, choose to break them.  Like with most things in life, we have to understand the rules before we can start to break them.

Well designed compositions can be achieved by understanding how the Elements and Principles of Design work together.  The Elements can be described as the parts in a car; the muffler, gas tank, brake pedal, windshield wipers, etc.  The Principles are how those parts work together.

As you work, ask yourself – 

How does the work of art create __________________ (insert principle) through the use of ___________________ (insert element) ?

For example: How does the work of art create repetition through line?  How does the work of art create balance through color?  How does the work of art create contrast through value?  How does the work of art create movement through space?  You could run through one principle with all 7 elements.

  • How does the work of art create contrast through line?
  • How does the work of art create contrast through shape?
  • How does the work of art create contrast through form?
  • How does the work of art create contrast through value?
  • How does the work of art create contrast through texture?
  • How does the work of art create contrast through space?
  • How does the work of art create contrast through color?

Asking these questions will help you have a better understanding of what is working in your composition and what needs to be adjusted. The principles of design help you to carefully plan and organize the elements of art so that your work is engaging and commands attention. 

Process:

  1. Choose one element, one principle and one material from your professor. No peeking.
  2. In your sketchbook or on scrap paper, brainstorm as many different possible ways to use the material as you can. Can you push the material so that its function is no longer its defining factor. ex. Using styrofoam cups to create clouds like Tara Donovan.
  3. After you have thoroughly investigated your material, create a work of art that explores your chose principle through your chosen element. For example – If your element was line and your principle balance, how could you use your materials to create a work of art that embodies ideas of balance (symmetrical, asymmetrical, radial) through lines?
  4. You’re going to have to get creative and some of your element / principle combinations may be more difficult than others. When you get stuck give yourself one minute to brainstorm as many possibilities as you can in your sketchbook. Try to get your brain out of the way and just work.

Possible Materials:

Research:

Student Work:

Soft Sculpture

Learning Objectives

  • Students will be able to demonstrate an understanding of color theory.
  • Students will be able to demonstrate an understanding of basic three dimensional terminology.
  • Students will be able to demonstrate a basic understanding of the techniques involved with soft sculptural forms.

Materials

  • Fabric (bright, solid colors or patterns)
  • Needle
  • Scissors
  • Thread
  • Stuffing materials
  • Tape Measure
  • Seam Ripper
  • Marking Chalk
  • Thimble
  • Safety Pins
  • Pin cushion

Mini Assignments

Part 1 – Take Notes in your sketchbook from the color theory section found here.

Part 2 – For the second part of the project create a color wheel using colored pencils, markers, paint or digitally. You will need to include primary, secondary and tertiary colors. The color wheel should include the hue, a tint, a shade, and a tone. Use the image below as a reference.

Part 3 – In your sketchbook create an example of each of the following color groupings – complementary, split complementary, analogous, triadic, cool and warm colors. Try to avoid red / green, blue / orange combinations. You may use the same materials that used to create your color wheel in Part 2 above.

Part 4 – Using found objects, create 3 color combinations based off the color groupings listed in Part 3 above. Photograph these color groupings and add them to your Google Sketchbook. Example of Jessica Stockholder‘s work below.

Important Terminology

  • Soft Sculpture – Sculptures composed of soft materials, such as rubber, latex, or cloth. Such works undermine traditional ideas about sculpture, namely that it be durable and made from “noble” materials like marble or bronze.
  • Fiber Arts – A style of fine art which uses textiles such as fabric, yarn, and natural and synthetic fibers. It focuses on the materials and on the manual labor involved as part of its significance.
  • CraftFine art has no functional aspects, whereas craft is utilitarian, usually with an artistic style/skill. A craftsman creates items that may have great beauty and take much skill, but are meant to be used in some way. This definition is now considered outdated but there are still issues within this distinction that are worth discussing.
  • Women’s Work – work traditionally and historically undertaken by women, especially tasks of a domestic nature such as cooking, needlework, and child rearing.
  • Feminist Art – Art that seeks to challenge the dominance of men in both art and society, to gain recognition and equality for women artists, and to question assumptions about womanhood. Beginning in the 1960s and 1970s, feminist artists used a variety of mediums—including painting, performance art, and crafts historically considered “women’s work”—to make work aimed at ending sexism and oppression and exposing femininity to be a masquerade or set of poses adopted by women to conform to societal expectations.

Major Assignment

For this project you have the choice of 1 of 3 different prompts:

  1. Create a sculptural interpretation of something you want, but you cannot have (for whatever reason – cost, location, etc) – be ready to explain your choices
  2. Create a sculptural interpretation of something you both love and hate – be ready to explain your choices
  3. Create a sculptural trophy – be prepared to explain what it is a trophy for, and why it looks the way it does.

Whichever prompt you choose you must consider both the texture of the fabric, the objects you make with the fabric and the color choices you use. The finished work can be one large piece or several smaller pieces that work together as a whole. The fabric (ANY fabric) can be stuffed with fiber fill (a limited amount provided) or any other material (think outside the box – sand, beans, wire, etc.) The minimum size is 3′ x 3′ x 3′.

  1. Research/Brainstorm: Find at least 5 artists working with fabric/fibers/soft sculptures that intrigue you. Add them to your Google Sketchbook. In your paper sketchbook, create at least 5 thumbnail sketches for 5 different ideas for your project. We’ll share the research/thumbnails in class. Be sure to think about the tools available – how do they help and limit you? Add these sketches to your Google Sketchbook.
  2. Sketches/Narrowing Ideas: Having heard everyone else’s ideas and research, sketch out 2 ideas in greater detail (devote at least 1 whole sketchbook page to each of these ideas – fill the page – draw large). We will share these refined ideas in class.
  3. Select idea and begin working: Once you select your idea, you can begin working. Each student will get a set amount of materials; anything beyond that is the responsibility of the student. We will have in-process critiques – see schedule for dates.
  4. Final Critique: We will hold a final critique of the sculptures
  5. Document your work. Make sure to get good quality photos with accurate lighting and color to upload to your Google Project Presentation.
  6. Self-reflection: After the project is over, you will answer the following questions in your Google Project Presentation
    1. Discuss your work in terms of the components of an artwork. (subject/form/content/context)
    2. How does the work engage with the elements and principles of 3D design? Make sure to mention specific elements and specific principles.
    3. How did you use color and texture in your work?
    4. How was your project successful?
    5. How could your project be improved?

Research

Skeletal Structure

Learning Objectives

  1. Students will be able to demonstrate various technical building skills as well as fine craftsmanship.
  2. Students will demonstrate an understanding of the sculptural process; going from idea, to sketchbook, to acquiring materials, to building, to refinement, to finished product.
  3. Students will be to define scale and proportion.
  4. Students will be able to effectively convey a change in scale.

Materials

  • An unusual object from goodwill, the dollar store, your mom’s closet. You will ruin this object so…
  • Super Glue or CA Glue (provided)
  • Fine mist spray bottle (provided)
  • Isopropyl Alcohol (provided)
  • Utility knife and extra blades (good to have your own)
  • Sketchbook and pencils
  • At least 5 pieces of 1/4″ square 36″ long balsa wood (provided)
  • At least 3 drawings that you are excited about and ready to discuss

Sketchbook

  1. Workout at least 3 sketches for your skeletal structure project. Try to think about your final project from multiple angles.
  2. Research some of the artists linked below and take notes in your sketchbook. Are there any of their works that you are particularly drawn too?

Info

Proportion / Scale – Proportion is the size relationship of parts to a whole and to one another.  Babies are cute because their heads and eyes are so large when compared to the rest of their body. Their head and eyes are not in proportion to the rest of their body. Whenever you start a drawing, you can check proportions by comparing one object to another and asking if it’s too big, too small, too flat, too round… Scale refers to relating size to a constant, such as a human body. If you look on the box of a model car kit, you’ll see numbers such as 1:24th scale. This means that the car in the box with be 1/24 the size of a real car. Some artworks work better on a small scale (creates intimacy) while others on a much larger scale (commands attention).

Sculptors have traditionally embraced scale and proportion to make monumental or large works. These works sometimes recognize historic events or challenge our understanding of objects and our place in the world. Think about how changing the scale of your object will force the viewer to think differently about what you’ve presented.

Project

Using 1/4” x 1/4” x 36” balsa wood strips, design and construct an enlargement of the object you chose. Your “skeleton” will be a identical copy of your object, only larger and more intricate. Focus on bringing more detail to areas that you find interesting.

Consider frameworks of boats and other architectural structures. You may choose an organic or architectural approach, or a combination of the two. To keep the emphasis on form and structure, do not incorporate color or the use of other materials in this project. How will you make curved forms out of straight sticks? How do you make an area that might not be very interesting engaging?

Please do several preliminary drawings of various solutions pertaining to the fruit or vegetable you have chosen. Remember that you will be using a linear material and your drawings should reflect this; i.e. do not merely drawn renderings of the fruit or vegetable as it is – rather, invent and draw a skeletal “framework”. If it would help, feel free to draw a rendering then trace over it with skeletal ideas. We will review your 3 favorite drawings at the beginning of our next class period, then the construction of your chosen solution may begin.

Research

Handout – Elements and Principles of Design

Presentation – Elements and Principles of Design

  • Richard Deacon
  • Martin Puryear
  • Sopheap Pich

Self-Portrait

Learning Objectives

Students will be able to combine both aesthetic and conceptual considerations into a cohesive work of art. Students will demonstrate excellent craftsmanship through the use of a variety of materials and methods of construction. Students will demonstrate an understanding of the work of the artist Joseph Cornell and Surrealism.

Materials

Wooden box at least 8” by 8”. The smaller the box, the more involved your piece needs to be. Try to find an old used one.
Wood glue and/or hot glue
Various found objects. Suggestions include photographs, maps, toys, strings, pins, etc. Be creative! Stay away from broken mirrors, fake blood, glitter and feathers.

Time

On Calendar

Homework

Studio Work
5 Sketches in sketchbook

Process

Students will create a self-portrait using the artist Joseph Cornell for inspiration. After researching his work and the work of others using the links below, students should start gathering materials and sketching out ideas. Your wooden box will serve as your canvas for this project.

Your box may need to be covered or stained to make it fit with the rest of your chosen materials. You can paint it and then sand it to create a weathered look or cover it in newspaper and stain it to give it a texture. You could also use stains to change the color of the wood. You may also cut sections away or add parts back to your box. You can add drawers or cut out holes for the viewer to engage with.

Using your collected materials, create a three-dimensional collage that illustrates your-self or at least part of who you are. You may include your beliefs about politics, religion, relationships, art, economics or anything that makes up you.

You can use any type of glue or pins to attach your collected items to your box, just make sure everything looks clean. If you can see hot glue and it is not part of the work, get rid of it.

When creating your box, think about the visual and conceptual connections between each element. They should work together and pull the viewer’s eyes around the work.

Resources

http://www.pem.org/sites/cornell/imagination.html
Joseph Cornell Images
josephcornellbox.com
Wikipedia
Jospeh Cornell YouTube

Product Design

Learning Objectives

Students will explore the process of product design from formulating ideas, creating two-dimensional drawings, and producing a three-dimensional model of both the finished product and packaging. Students will be able to demonstrate what they have learned thus far concerning the elements and principals of design.

Materials

Paper
Sketchbook
Pencil
Colored Pencils
Markers
Insulating Foam (2” Pink or Blue)
Wood
Glue
Paint
Cardboard
Spray Foam

Time

4 Classes

Homework

Visit local stores to brainstorm ideas. (Target, Wal-Mart, etc)
Work out ideas in sketchbook
Work with other team members outside of class to complete project

Process

Students should come prepared to class having watched the videos below, researched the links and brainstormed ideas. Students will be broken into pairs for this project. As a group, students will decide on a product that they want to either redesign or recreate entirely. You are encouraged to think outside of the box, however don’t try to reinvent the paperclip.

Look around you and think about the things you use everyday. How could you make your coffee cup, computer mouse, door handle, cable organize, baby toys, bath products, car keys, dishes, pens, or pencils better? There are many categories of product design from fashion accessories to games to home products. You may create a piece that simply improves upon an already existing product, combine several functions into one device or create something entirely new. Stay away from digitally based products. I want to be able to interact with the object once you have made it. Ask yourself “Why is this object made this way?” Some of the best designs are when you don’t even realize that the object has been designed.

Once you have decided on what to make, start thinking about color, materials and packaging. Does the item need to be made from plastic, steel, concrete, or wood? Will your packaging focus on eco-conscious ideas or go with the mentality that “bigger is better”?

You will need to construct your product and packaging from quality materials. Don’t use ragged cardboard or messy glued on paper. Your finished work should look like it is ready for store shelves.

Make sure to communicate with your group. You will be earning two grades for this project; one for you individually and one as a group. There are no excuses for sitting on the sidelines.

There are several components that will be presented as the finished work. These include:

1. Preliminary Sketches and Ideas
2. Final Product Design presented on 1 large sheet of 18” by 24” paper, in color
Make sure your product is drawn from multiple examples and multiple stages of use. Do you need to include a person for size
reference? Does you product open or twist? Show it in both the open and closed form.
3. Final Package Design presented on 1 large sheet of 18” by 24” paper, in color
Again draw the packaging from multiple sides. Draw how the product fits into the packaging.
4.The actual product.
5.The actual packaging.

Resources

Objectified Trailer
Jonathan Ive Interview
Apple Design
Design Within Reach
IKEA
MoMA Architecture and Design
MoMa Elastic Mind
designboom
Cool Hunting
Colour Lovers
Core77

Poly Relief

Learning Objectives

  • Demonstrate an understanding of the visual elements and principles of design.
  • Develop and refine problem-solving skills to enhance creative thinking.
  • Be able to define 4 major methods of sculpture – relief, in the round, installation, and time based.

Important Terminology

Volume: refers to the space within a form
Plane: that element of form which can be described in two dimensions, predominantly characterized by surface, or any flat or level surface (planar materials include: cardboard, sheet metal, paper, fabric, etc.)
Maquette: a small sculpture made as a preparatory study or model for a full-scale work
Formalism: The concept that a work’s artistic value is entirely determined by its form–the way it is made, its purely visual aspects and its medium. Formalism emphasizes compositional elements such as color, line, shape and texture rather than realism, context or content. To put it as simply as possible, formalism deals with formal properties of art primarily and deals with concept second or not at all.

Materials

Sketchbook
Cheap poster board (for maquette) – (you must make/show your maquette and get approval prior to final project) – final project should be similar to your maquette and sketches – bring both to the final critique
Masking tape (for maquette ONLY)
Several sheets of mat board (purchased from Art Supply store)
Utility knife with lots of replacement blades
X-acto knife with extra blades
Scissors (only heavy duty ones will work, like kitchen scissors)
Ruler, Protractor, Compass, Calculator
Glue gun & glue sticks
White glue
Rubber bands (big ones)
Small cheap brush

Mini-Assignments

1. Research different methods used in paper construction.
2. Look over images located on art website.
3. Sketch out at least 5 different sculptures from multiple angles in your sketchbook.
4. Accumulate materials to bring in to class.
5. Create a small maquette for your anticipated sculpture.

Major Assignment

Create a sculpture that emphasizes volume through planes. The resulting project will be a closed form that protrudes from the wall. The sculpture should attach to the wall, change the wall or look like it comes from the wall but cannot be free standing. The sculpture should be abstract and utilize the elements and principles of design. The sculpture should be about 2 feet wide or larger.

The elements of design are line, shape, form, value, color, texture, and space (positive/negative)
The principles of design include pattern, rhythm/repetition, contrast, balance, unity, emphasis, movement.

You may abstract a familiar object or work purely with the elements and principles of design. No representational imagery, no clichés. The work should use the natural color of the mat board (it is pretty difficult to paint without getting bubbles).

CRAFTSMANSHIP is KEY – the construction must look good, the angles must look good, the surface of the mat board must look good, etc. Remember, this is about formalism, so the overall aesthetic is KEY!

Readings

The readings for this assignment focus more on design aesthetics than building something with mat board. Read “Ten Principles for Good Design: Dieter Rams” and watch the video below. Answer the following questions. Do you agree with his design principles? Why or why not? Can you think of a few bad designs? What about really elegant ones? How might this affect how you work on this project?

Considerations

Remember that this is an exercise in activating space using fabricated volumetric forms.
Craftsmanship will be pivotal to your grade! Use of tape & structure are VERY IMPORTANT. Content is not the end goal here. Formalism is! The forms should be interesting and engaging. It must be wall mounted.

This project is extremely time intensive. Be prepared. Use your time wisely. With that said, this is your opportunity to visually express what you know. This assignment is a good exercise for preparing you for metal fabrication, package design or soft sculpture. The idea is to use flat planes to create volume.

Determine where your sculpture will be exhibited…try to imagine it is a commissioned artwork. Where should it go?

Research

David Smith
Tony Smith
Robert Morris
Donald Judd
Constantin Brancusi
Thomas Demand
Low Poly Sculptures (lots of good ideas)
The Art of Cardboard
Cardboarders.com
Paper models of polyhedra
Geometric Nets
Scott Roberts

Plaster Texture

Learning Objectives

  1. Demonstrate an understanding of the visual elements and principles of design.
  2. Demonstrate an understanding of additive and subtractive sculpture processes.
  3. Demonstrate an understanding of texture, harmony and contrast.

Important Terminology

  • Plaster – a soft mixture of lime with sand or cement and water for spreading on walls, ceilings, or other structures to form a smooth hard surface when dried.
  • Additive – Is the process by which material is shaped and built up, frequently on an armature, to create the desired image.
  • Modelling – An additive process in which material is steadily built up to produce the finished figure.
  • Subtractive – Involves removing material, as in wood carving or stone sculpture, to create a finished work.

Materials

  • One box or bag of Plaster of Paris (provided)
  • Old metal butter knives
  • Dental tools or clay tools (some provided)
  • Box for casting (shoe box or larger – heavy cardboard) – at least 12″ by 10″
  • Glue gun and glue sticks (may want to bring your own glue gun)
  • Small wire brush (provided)
  • Old rags or t shirts
  • 5 gallon bucket (provided)
  • Dry wall sand paper mesh (provided)
  • Rasp (provided)

Sketchbook Mini-Assignments

  1. In your sketchbook, create a grid of 3 by 4 squares. Fill each square with a different type of texture. Try to draw as much as possible from real life. Use the images below as an example.
  2. Watch the videos below and take notes.
  3. Research the artists linked below.
  4. Come to class with at least 5 sketches of your proposed plaster carving.

Project

One plaster sculpture that is at least 12″ by 6″ that embodies two of the words from the chart below.

Chose 2 words from the list below, one from column A and one from column B. Once you have chosen your two words, sketch out ways to combine the two different textures into one object. You might have the inside of the object be smooth while the outside is rough, you might juxtapose two different textures or let them merge into something else entirely.

Think about the entire form of the object and how the viewer will interact with it. What will they notice first, second? Will there be an area that is very delicate and another that is very aggressive. How will you allow these two areas to play off of each other? How will light contribute to the work? Will you be able to see through it? What precautions should you take as you work – plaster is extremely fragile.

Before you start carving, create at least 5 different sketches in your sketchbook that play with various approaches to your words. What happens if you change the scale or texture? Think about how you will be using the elements and principles before you ever start carving.

After you have chosen your words and created your 5 sketches, you will need to cast the plaster. Make sure you pay attention in class and if you are still unsure, watch the video below. Once you have cast your plaster in its container, remove it and immediately start carving. The drier the plaster gets the harder it is to carve (but easier to sand).

A note on cleaning up. Plaster is messy. Really messy. Do not ever, ever, ever allow plaster to go down the drain. It is like cement and will harden in the pipes. Use the waste bucket first to wash your tools and your hands. Once you are done using your carving tools, scrub them with your wire brush and water in the plaster waste bucket. Once they are clean rinse them with water and DRY them. Always dry your tools or they will rust.

embossedcushioned
crochetedflaky
flawedbumpy
gelatinousfurry
icyjagged
limppatterned
pointypierced
sharpswollen
viscouswooden
holeythorny
silkyscraped
pockedpleated
ornamentedmosaic
knittedknobbed
grainyfeathery

Research

Texture images
Kathyne Martin

Mutation / Adaptation / Hybrid

Learning Objectives

Demonstrate an understanding of the visual elements and principles of design.
Demonstrate an understanding of mold making and casting.
Demonstrate an understanding of finishing techniques for cast objects.

Important Terminology

Cast – A reproduction of an original piece of sculpture in any number of casting materials, most commonly plaster, plastic, or bronze.
Catalyst – A substance which changes the rate of a chemical reaction without itself undergoing permanent change in its composition; a substance which markedly speeds up the cure of a compound when added in minor quantity as compared to the amounts of primary reactants.
Curing Time – The period of time for a material to fully cure. Also called demold time.
Demolding – The process of removing a mold from a model or a casting from a mold; by mechanical means, by hand or by the use of compressed air.
Keys – A pin or key used to bring mold halves or sections into alignment on closing or joining together so they will not shift. Usually consists of a depression in one part and a matching protrusion in another part.
Mold – The cavity / form that carries a negative or reverse impression of an original model. Molds can be made of a rigid material, such as plaster or plastic resin or more commonly, a flexible material such as rubber. The material to use should be chosen considering the material of the model, the material to be used to make castings, and whether there are any undercuts.
Parting Line – A mark on a molded piece where the sections of a multi-piece mold have met in closing.
Pot Life – The amount of time that a catalyzed material remains workable (pourable for a liquid or trowelable for paste) after components have been mixed together.
Reinforcement – A strong inert material such as glass fibers, cotton, or burlap that is added into a casting material to increase the strength of the finished product. Some casting materials act mainly as binders for reinforcement. It is the reinforcement that gives strength, hardness, and break resistance.
Release Agent – A spray, liquid or powder used to prevent sticking of molded articles in the cavity.
Undercut – Any indentation or protrusion in a shape that will prevent its withdrawal from a one-piece mold.

Materials

100% silicone (found in tubes at Walmart, Home Depot)
Caulk gun (can be shared)
Large Popsicle sticks
Latex or vinyl gloves (can be shared)
Objects to mold
Paint (If using spray paint, buy Matte)
Oderless paint thinner
Corn Starch
Plastic cups or cheap mixing bowl
Box or bag of plaster (Home Depot)
Vaseline or cooking oil spray

Mini-Assignments

1. Gather all materials required for assignment.
2. Work out at least 15 different combinations of your objects. Make sure to watch the Allan McCollum video below for ideas on how to combine objects. You may draw these out, photograph them, collage them, etc.
3. Practice mold making so that you understand the steps involved.

Readings

Mold Making (PDF)
For additional info, Google “DIY Oogoo” or “Pourable silicone mold oogoo”.

Major Assignment

Choose an object (or small group of objects) that you’d like to “mutate”. Visit the dollar store or Goodwill for some interesting finds. Look for objects with interesting textures and shapes, things that you could combine to create a new object. Don’t worry about the color of the original object.

Once you have your objects, think about how you will combine them and mutate them. Suggested mutation techniques: wrapping, carving, bending, deconstructing, combining, stacking, dissecting, smashing, disfiguring, sanding or wearing away, melting, etc. Anything you do to the object before you make the mold will show up in the mold. Explore ideas in your sketchbook include a variety of shapes, sizes and colors.

You will need to produce at least 5 objects that are either each completely different individual sculptures or that work together to create a large sculpture. You will need to make sure that seams are seamless and that the objects are well painted.

Decide how you will display this object (or group of objects). Consider its scale. Should it be on the floor, hanging on a wall (or sitting on a shelf on the wall), or resting on another object such as a table?

Research

Motion / Sound

Learning Objectives

Students will be able to demonstrate fine craftsmanship, an intense and investigative approach to materials and rigorous conceptual thought. Students will be able to create a work of art that not only engages the visual, but also the auditory. Students will be able to give examples of the works and processes of the artists listed below.

Materials

Materials to be chosen based on your project.

Time

On Calendar

Homework

Studio Work
Research artists listed below
At least 10 Sketches in sketchbook

Process

Students will create a three-dimensional work of art that creates visual interest while also creating something for the ears. The goal of this project is to push the student in terms of conceptual development. Your final piece should not only look nice but it must make the viewer aware of the noises and sounds around them. One of the most famous pieces similar to this project is John Cage’s “4 minutes 33 seconds”. Cage filled an entire orchestra hall with people and a full orchestra. For the above mentioned time, the orchestra remained absolutely silent. The music was not what the instrumentalists were doing, it was the noise around the audience. From the rustle of gum wrappers to a persistent cough, Cage’s work made the audience pay attention to the things around them. That is your goal. Whether it be through loud, obnoxious sounds or the gentle whisper of a breeze, make the viewer pay attention.

Your project may use any materials you like, but good craftsmanship is a must. Your work may be activated through a hand crank that the viewer must turn, a piece that is only activated when the door opens, or a work that is made to create sound when the wind blows. You may even use motion sensors to start a cd player and create a digital sound if you wish. Simple examples of these would be a door chime, bells hung on a business door, wind chimes etc. Your project should be much more complicated than these simple examples. It can be either outdoors or indoors.

Resources

John Cage, Bernie Lubell, Sound Sculpture, Sonic Arboretum, Luke Jerram, Odd Music, Bill Fontana, Sound Installation, Sound Art Thesis Paper (Excellent Read), Sound Art (Wikipedia)