Learning Objectives
Students will explore Adobe Photoshop workspace
Students will demonstrate understanding of the relationship between image size and resolution
Students will use non-destructive image editing techniques to preserve original image properties
Exercise Files on D2L:
This handout, demo video, and all exercise .jpegs downloaded to your computer
Tools and techniques covered:
- Resolution and image size relationship
- Non-destructive editing vs destructive editing
- Selecting and importing appropriately sized digital collage materials
- Scanning collage materials to the proper resolution / size
- Layer management
- Layer masking with brushes, selection tools, and work paths
- Adjustment layers and creating targeted clipping mask adjustment layers
- Exporting and sharing files with WeTransfer.com
Project:
Part 1: Create a new Photoshop document and set up the workspace
- Create a new folder for your Exercise 3 files on your computer’s desktop. Label the folder LastName, FirstName Exercise 3

- Open Photoshop and create a new 8”x10,” 300dpi, RGB color space file, White Background. Label your file LastName_FirstName Exercise 3 (Example Anfinson_Erin Exercise 3)
- Before you click “Create,” change the document size settings in the drop down menu from Inches to Pixels. Notice the size of your document—2400px x 3000px. Keep this overall pixel x pixel dimension in mind as work on the exercise. Try this handy online calculator for help with Inches
Pixel calculations in the future!
- Click “Create.”
- Immediately Save this file by going to File > Save or hitting Command S on your keyboard and save it to your Exercise 3 folder
- Go to Window > Workspace > Essentials
Part 2: Prepare all individual digital collage materials (jpegs)
The provided collage layer images were all downloaded in a variety of different sizes and resolutions that don’t match the 8”x10,” 300ppi collage canvas. To avoid any surprises and better understand the relationship between image size and resolution, you will take an extra step to prepare each separate collage jpeg before copying and pasting it to your final collage canvas.
Open and redistribute the pixels in your digital collage layer jpegs to 300ppi
- Leave your 8”x10” document alone and open each digital collage layer jpeg downloaded from D2L separately in Photoshop. To open an image file, go to File > Open… or type Command O on the keyboard. Select an image file and click Open.
- Once your image opens, examine its size and resolution in the Image Size dialogue box by going to Image > Image Size…
- Determine the overall size and resolution of your collage material. Redistribute the pixels to 300ppi by typing 300 in the resolution box. Make sure that Resample Image is NOT checked! *Take note of the unchanged pixel x pixel dimension and the changed inch x inch dimension of the image. It will be smaller if the image was less than 300ppi.
- Save your changes File > Save or Command S
- Click Ok on the following jpeg quality menu and keep your image open.
- Repeat steps 1-5 for all of your downloaded collage layer images.
TIP: Try this handy online calculator for help with Inches Pixel calculations in the future!
(EXTRA: Not in video… Move on to Part 3)
Rotate & Crop your image, if necessary
- Go to Image > Image Rotation > Select the degree you need to rotate your image
- Select the Crop tool (C) from the toolbar on the left side of the workspace.
- Click & drag the Crop tool to reframe tighter to the object you want to cut out.
- To commit to the crop, hit Enter or click the checkmark in the Crop options bar on top of the workspace. TIP: If at any point you want to cancel the crop, hit the ESC key
Spot heal and repair any damaged areas of your image, if necessary (DESTRUCTIVE)
- Select the Spot Healing Brush tool (J) from the tools panel. (Looks like a Band aid with a dotted 1/2 circle.)
- Look at the Tool options in the bar at the top of the window. Select the type of brush you want and the type of healing mark (Proximity Match) and keep Sample All Layers box unchecked.
- Select a small area on your image to heal. Use the left [ and right ] keys to scale the brush lager and smaller. Make the scale of the brush slightly larger than the spot you want to heal.
- Click and see what happens! If you are happy with the repair, move on. If not Undo (Command Z) and change the properties of the brush if necessary.
Part 3: Copy and paste individual collage images into main document
- Select an open collage image in the Layers panel, go to Edit > Copy or type Command C
- Go to your 8”x10” Photoshop document, go to Edit > Paste or type Command V
- Your collage layer will be pasted to a new layer in your 8”x10” Photoshop document. WARNING: Do not use the Selection tool (V) to enlarge or shrink the scale of the layer yet!
- Double-click the layer in the Layers window and rename the layer
- Repeat steps 1-4 for each open collage image
- When you are finished, close the individual collage images and save any changes.
Part 4: Non-destructive digital cutting with Layer Masks
Cutting out/around objects
OPTION 1: Use the Lasso tool to draw a selection and create a simple Mask
https://helpx.adobe.com/photoshop/how-to/selection-tools-basics.html
- Select one of your collage material layers to digitally “cut”
- Use the Lasso tool (L) from the tool bar and sure the “Add to Selection” option is on in the tool properties bar at the top of the screen.

- Click and drag to begin tracing around the border of the image selection you’d like to cut out, holding the Option key while you work. Holding the Option key will allow you to pause and add to your selection!
- If you need to add small areas of the selection after it is closed, keep the Add to Selection property selected and simply draw the selection extension, making sure to cross the original path.
- If you need to remove small areas of the selection after it is closed, activate the Subtract from Selection property and draw the selection area to be removed. TIP: This is a great way to make holes!
- When your selection is ready, create a Mask on your layer by clicking on the Add Layer Mask icon in the lower toolbar of the Layers panel.
- Your selected image will be masked out and a new mask will be created next to the image in the layers panel. Notice that everything that was masked out is black and your image selection is white.
- Save your work (Command S).
OPTION 2: Use the Quick Selection tool to draw a selection and create a simple Mask
- Select one of your collage material layers to digitally “cut”
- Use the Quick Selection (W) tool from the tool bar and begin dragging the tool over the area of the image you’d like to cut out. Change the brush size for the tool with the bracket keys [ & ].
- Refine the selection with the + and – options on the Quick Selection tool. You can access the – option by holding the Option key on your keyboard. It may take a few passes and brush size changes over the object to get the results you want.
- To correct small areas of the selection, use the Lasso tool, making sure the “Add to Selection” option is on.
- When your selection is ready, create a Mask on your layer by clicking on the Add Layer Mask icon in the lower toolbar of the Layers panel.
- Your selected image will be masked out and a new mask will be created next to the image in the layers panel. Notice that everything that was masked out is black and your image selection is white.
- Save your work (Command S).
OPTION 3: Use the Lasso or Quick Selection tool to draw and save a reusable Path
- Select another one of your collage material layers to digitally “cut”
- Click on the Paths tab in the Layers panel
- Use the Quick Selection (W) or Lasso tool (L) to create a selection as in the previous examples.
- When you are finished drawing the selection, save the selection as a reusable Path by clicking on the flyout menu in the upper right portion of the Paths panel. In the flyout menu, Select the Make Work Path > Tolerance level 1 pixel > Click OK or click on the Make Work Path icon in the in the lower toolbar of the Paths panel.
- Double-click the new path to name it and save it.
Keep your newly named path selected and click on the Load Path as a Selection icon in the lower toolbar of the Paths panel.
- When your selection is ready, click on the Layers tab, make sure the correct layer is selected, and create a Mask on your layer by clicking on the Add Layer Mask icon in the lower toolbar of the Layers panel.
- Your selected image will be masked out and a new mask will be created next to the image in the layers panel. Notice that everything that was masked out is black and your image selection is white.
- Save your work (Command S).
OPTION 4: Use the Pen tool to draw and save a reusable Path
- Select another one of your collage material layers to digitally “cut”
- Click on the Paths tab in the Layers panel
- Use the Pen tool (P) tool from the tool bar to draw a path around the image you’d like to cut out. Remember to click and drag to pull the Bezier curve handles to best fit the curves you are tracing and close the path. The path you draw will appear in the Paths panel as a Work Path.
- You can use the Direct Selection tool (A) and/or the Add/Delete Anchor point tools to alter the path where needed.
- Double-click the Work Path to name it and save it.
- Keep your newly named path selected and click on the Load Path as a Selection icon in the lower toolbar of the Paths panel.
- When your selection is ready, click on the Layers tab, make sure the correct layer is selected, and create a Mask on your layer by clicking on the Add Layer Mask icon in the lower toolbar of the Layers panel.
- Your selected image will be masked out and a new mask will be created next to the image in the layers panel. Notice that everything that was masked out is black and your image selection is white.
- Save your work (Command S).
Bonus! Need to Reverse or Invert a layer mask?
Double click the mask icon to reveal its properties, scroll to the bottom of the panel window and click Invert. Or simply hit Command I on your keyboard.
Altering and fine tuning masks with white and black paint
When using Masks to non-destructively cut images in Photoshop, black and white paint are the only colors you will use in the foreground color.
Black = Remove image on Mask White = Add image on Mask
OPTION 1: Use the Brush tool (B)
- Keep the mask for your collage layer activated
- Select your Brush tool (B) and notice that your color choices are only black and white
- Check out the Brush tool settings in the upper toolbar and set to the desired setting. Example: Size 3, Mode: Normal, Opacity 100%, Flow 100%.
- Open the Brush Size drop down menu and change the hardness to 100% for our current purposes.
- Use black paint and brush to remove areas of the image you want to disappear. Remember you can change the size of the brush using the [ & ] keys!
- Change the foreground color to white, and try painting areas of the mask to replace the image.
- Experiment with different brush settings for different effects.
- Finish fine tuning the edges of your mask and save your work.
OPTION 2: Fill selected shapes with black paint to create holes through images
- Select a layer from the layer stack to cut a hole through.
- Create a mask by clicking on the Add Layer Mask icon in the lower toolbar of the Layers panel. Keep the layer mask activated.
- Use any of the already covered selection tools to create a hole shape in your image. Look for interesting areas to create “windows” to lower layers. i.e. doors, windows, glasses, binoculars, etc…
- Once our selection is made, activate the Paint Bucket tool (G), make sure your foreground color is Black (Press D on the keyboard to reset the color chips) and click inside your selection to fill the mask with black and cut the hole.
- Deselect (Command D)
- Save your work (Command S)
Part 5: Scale, Rotate, Flip, Duplicate, and Group your collage layers
Now that your collage layers are cut out, it’s time to have some fun transforming them on your digital canvas!
Transform the scale of your layer
- Select one of your masked collage layers with the Move tool (V). A frame should appear around your layer. *If not, check Show Transform Controls in the top tool properties bar or hit Command T to activate the transformation tools.
- Hold the Shift key down, then click and drag a corner of your layer to reduce its scale while keeping it’s proportion. Do not let go of the Shift key until you are done dragging!
- As you are dragging notice the percentage changes in the top tool properties bar. Do not enlarge your image past 100% or it will look pixelated and blurry. If you need a larger image, you must start with a higher resolution download or scan.
- Hit Enter on your keyboard to accept the transformation or click the
in the toolbar. To cancel a scale transformation, click the
icon.
- Save your work (Command S)
Rotate your layer
- Select one of your masked collage layers with the Move tool (V). A frame should appear around your layer. *If not, check Show Transform Controls in the top tool properties bar or hit Command T to activate the transformation tools.
- With the Move tool, hover the cursor outside of one corner of the collage layer to activate the rotation tool. Click and drag to the desired rotation. TIP: If you hold the Shift key while you rotate, the layer will rotate at 45° angles.
- Hit Enter on your keyboard to accept the transformation or click the
in the toolbar. To cancel a scale transformation, click the
icon.
- Save your work (Command S)
Flip/Mirror your layer
- Select a cut collage layer with the Move tool
- Go to Edit > Transform… > Flip Horizontally (or vertically)
- Save your work (Command S)
Other Transformation tools
For more Transformation tools, and/or precise transformations to your layers, go to Edit > Transform > and select your tool from the flyout menu.
Duplicating layers
- Holding the Option key, select a cut collage layer with the Move tool (M). A second white cursor will pop up.
- Drag the duplicate of the collage layer elsewhere on the canvas. Notice where it appears in the Layers panel and rename if necessary for organization.
- Repeat for as many duplicates as you’d like.
- Save your work (Command S)
Group collage layers in a folder
If you’re Layers panel is getting cluttered with a lot of duplicates, you may want to Group them in a folder so they move as one unit on your composition.
- Select a multiple cut collage layers or duplicate layers with the Move tool. Hold the Shift key as you select each additional layer.
- Open the upper right flyout menu in the Layers panel and select “New Group from Layers…” or type Command G on your keyboard.
- Name your new group in the pop-up window and hit Ok.
- Your group folder is now in the Layers Panel.
- Save your work (Command S)
Moving or Transforming individual layers in a group
If you need to adjust the position or transformation of an individual layer in a group folder, do the following.
- Twirl open the Group folder in the Layers panel and select the layer or layers you’d like to adjust. TIP: To select multiple layers, hole the Command key while selecting.
- Hit Command T on your keyboard to activate the Transformation properties. Then move, rescale, rotate, etc. the individual group layer.
- Hit Enter on your keyboard to accept the transformation or click the
in the toolbar. To cancel a scale transformation, click the
icon.
- Save your work (Command S)
Part 6: Using non-destructive Adjustment Layers to alter your digital collage
An adjustment layer applies color and tonal adjustments to your image without permanently changing pixel values. —helpx.Adobe.com
Once your collage materials are arranged, you can use adjustment layers to create controllable non-destructive changes to the color saturation, color balance, and contrast levels of your collage images.
Adding blanket Adjustment Layers to change the color saturation level of your collage
- Create a new Hue/Saturation Adjustment Layer by clicking on the Create New Adjustment Layer icon at the bottom toolbar of the Layers panel or go to Layer > New Adjustment Layer > Hue/Saturation…. The adjustment layer will be added to the top of your stack and will affect every layer below it.
- Activate the Adjustment Layer Properties by double clicking the adjustment layer icon.

- In the Properties panel, drag the saturation level scale down to reduce the overall image color saturation.
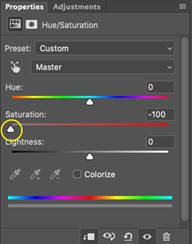
- Make adjustments until you are satisfied with your results.
- Try activating the Colorize tool in the Adjustment layer properties panel too.
- Save your work (Command S)
Adding blanket Adjustment Layers to change the Contrast level of your collage
- Create a new Levels Adjustment Layer by clicking on the Create New Adjustment Layer icon at the bottom toolbar of the Layers panel
or go to Layer > New Adjustment Layer > Levels…. The adjustment layer will be added to the top of your stack and will affect every layer below it.
- Activate the Adjustment Layer Properties by double clicking the adjustment layer icon.

- In the Properties panel, drag the black, grey, and white sliders to adjust the contrast levels in your collage.
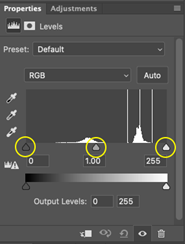
- Make adjustments until you are satisfied with your results.
- Save your work (Command S)
Adding targeted/clipped Adjustment Layers increase the contrast in 1 individual collage layer
Sometimes you just need to adjust the color or contrast of an individual layer. Through a simple step you can target or clip the adjustment to a a single layer or a group of layers in a folder.
- Create a new Hue/Saturation Adjustment Layer by clicking on the Create New Adjustment Layer icon at the bottom of the Layers panel OR go to Layer > New Adjustment Layer > Hue/Saturation…. The adjustment layer will be added to the top of your stack
- Drag the Hue/Saturation Adjustment Layer down the layer stack until it is on top of the individual layer or group folder you want to adjust.
- Activate the Adjustment Layer Properties by double clicking the adjustment layer icon.

- In the Properties panel, click the Create Clipping Mask icon at the bottom of the properties panel.
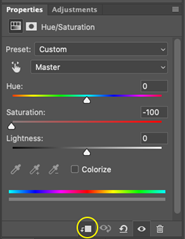
- Any adjustments you make will now be targeted to the single layer or group. Make adjustments until you are satisfied with your results.
- Save your work (Command S)
- Repeat the above steps with other individual layers or groups and try different adjustment layers.
- Save your work (Command S)
Part 7: Wrapping up your collage
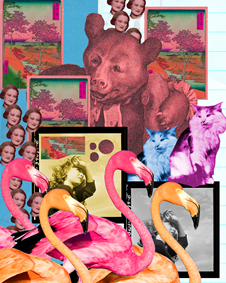
After you have completed Parts 1-6, focus on wrapping up your collage and customizing it to with transformations, adjustment layers, duplications, and windows or holes cut through layers. See the requirements below for exercise assessment criteria.
Exercise Requirements (Assessment criteria)
- Image size and resolution for all collage layers should be correctly prepared and copied/pasted into the 8”x10” digital collage.
- All collage layers should be digitally cut with a mask with no feathering applied to mimic cut paper.
- At least 1 layer should have a window or hole cut out to reveal a hidden layer below.
- At least 1 layer is duplicated several times and duplicates are grouped in a folder.
- At least 1 blanket adjustment layer should be used to change the color or contrast of the entire digital collage.
- At least 2 layers or layer groups should have clipped/targeted adjustment layers
- Workspace organization: Layers are labeled and on the correct art boards.
- A jpeg is correctly exported and included in your exercise submission
Exporting and submitting your exercise:
Export a jpeg
- When you have finished Exercise 3, go to File > Export > Quick Export as JPEG
- In the Save As dialogue window, navigate to you Exercise 3 folder, label your image LastName_FirstName Exercise 3.jpeg (Example: Anfinson_Erin Exercise 3.jpeg )
- Next, click Save.
Compress your Exercise files and submit via the free file transfer website, WeTransfer.com
- Compress or zip your Exercise 3 folder containing the original Photoshop .psd file & the exported jpeg. On a Mac, select the folder and go to File > Compress “Exercise 3 Folder.” A .zip file will be created next to the folder
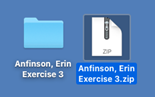
- Go to WeTransfer.com, upload the .zip file, type your name and “Exercise 3” in the Message box, and send it to Erin.Anfinson@mtsu.edu
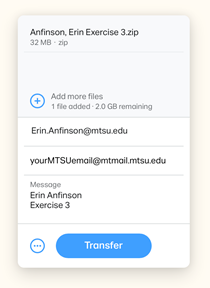
- Click Transfer files
- You will receive a confirmation email when the transfer is downloaded