Learning Outcomes
- Students will familiarize themselves with the Adobe Illustrator workspace
- Students will edit and modify drawn paths to create balance
- Students will implement proper labeling to keep an organized workspace
Project
In this exercise you will be introduced to the Adobe Illustrator work space, vector paths, and vector path drawing and modification tools.
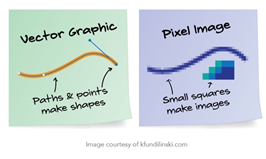
What are vector graphics and why are we using them?
- Vector graphics are mathematically calculated paths with anchor points, not a collection of pixels. They are smooth and infinitely scalable.
- When you draw a shape it is created with anchor points and a surrounding path that the program mathematically scales up and down
Directions:
- Watch the Vector vs. Raster (Pixel) video on D2L
- Load the exercise demo video to watch while you complete the exercise.
- Create a New File in Illustrator with (4) 8 ½” x 11” artboards (File > New…) Select RGB color space, 300ppi resolution.
- Label the file LastName_FirstName Exercise 0.ai (Example: Anfinson_Erin Exercise 0.ai)
- Change your Workspace to Painting (Window > Workspace > Painting)
- Open the Layers Window (Window > Layers) and create 4 layers by clicking on the “Create New Layer Button.” Label each layer the following by double clicking on the layer name:
- Layer 1: Pencil Tool
- Layer 2: Pen Tool
- Layer 3: Modified Paths
- Layer 4: Exercise 1
- Save your work by going to File > Save or hitting Command S
Artboard 1 / Layer 1: Drawing vector paths with the Pencil Tool (Command N)
- Click the pencil tool to activate
- Double Click the pencil tool to alter its properties check only the following:
- Move Fidelity slider to Accurate
- Keep selected
- Option key toggles Smooth Tool
- Close paths when ends are within 10 pixels
- Select Ok and then draw a heart on your artboard, be sure to fully close the path!
- Experiment with changing the fill color, stroke color, stroke weight, and width profile in the top navigation bar
- Next, open the pencil tool properties and change the Fidelity to Smooth
- Draw another heart and notice the difference in the path smoothness and number of anchor points.
- Try using the Smooth Tool to smooth the path or hold Option key while using the Pencil too to engage the Smooth Tool
Artboard 2 / Layer 2: Drawing Vector paths with the Pen Tool (Command P)
- Hide Layer 1 in the layers panel and click on Layer 2 to activate
- Click the Pen tool to activate
- Draw a heart on your artboard with the pen tool by clicking to add anchor points, be sure to fully close the path! To make curves, click, HOLD, and drag Bezier curve handles each time you make a new anchor point.
- Experiment with changing the fill color, stroke color, stroke weight, and width profile in the top navigation bar
- Draw 2 more hearts on the art board for practice
Artboard 3 / Layer 3: Modify Paths with the Direct Selection, Smoothing, and Anchor Point, Path Eraser, Pencil, Path Join and Width profile tools.
Tool locations:
- Direct Selection tool (A)
- Smooth tool (under Pencil tool—click and hold to find)
- Path Eraser tool (under Pencil tool—click and hold to find)
- Path Join tool (under Pencil tool—click and hold to find)
- Pencil tool (use pencil tool to connect two open paths)
- Add +, Subtract -, and Anchor Point Curves Anchor Point tools (under Pen tool—click and hold to find)
- Width Profile tool (Shift W)
- Hide the Pen Tool Layer and click on the Modified Paths layers to activate
- Use the Pencil tool with accurate Fidelity to draw a closed organic splat shape. Fill the shape with a color of your choice.
- Click on the Direct Selection (A) tool to activate the path and anchor points.
- Click one of the anchor points and drag it to a new location.
- Notice the Bezier curve handles that are also activated—click and drag the handles to change the curve
- Finally, try holding the option key, then dragging one of the Bezier curve handles to only move on side of the curve.
- Select the Smooth Tool to smooth a portion of the path by clicking and dragging the tool over the section you want to smooth. NOTE: You can change the fidelity of the smooth tool by double clicking it.
- Next, activate the Path Eraser tool and use it to erase a portion of your path by clicking and dragging the tool over the area of the path you want to erase.
- Next, use the Penciltool (N) to draw a new connection between the path ends.
ALTERNATIVELY…
10. Next, activate the Path Join tool, and rejoin the paths you just erased and split by dragging the tool from one end of the split/erased to its opposite end.
11. Change the general width profile of the drawn path by selecting a preset profile from the drop down menu in the Stroke properties.
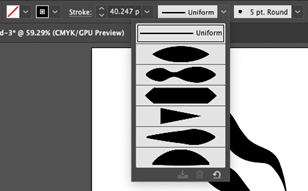
12. Custom change the width profile of your drawn path using the Width Profile tool (Shift W). Activate the tool and click anywhere on the path to widen or narrow the width of the stroke. TIP: Hold the Option key while dragging to only affect 1 side of the stroke.
Artboard 4 / Layer 4: Test your skills
Continue your practice with the path drawing and editing tools by creating a drawing of a leaf of the your official state tree (look it up online and make a drawing of it from observation). When you are done, scale your drawing up proportionately to fill the page by using the Selection tool (V). TIP: Keep the drawing proportionate by selecting the leaf shape and, hold the Shift key, and drag the corner box to scale the drawing.
Don’t stress about making a perfect drawing! Just do your best and no tracing allowed!
Exercise requirements and assessment criteria:
- Use of a closed path for the general leaf profile drawing.
- Was an effort made to edit and modify the drawn paths. Is there a balance of smooth & organic/natural curves in the drawn paths?
- Use of stroke and variable width profiles on all drawn lines.
- Use of fill and stroke colors for all drawn elements
- The leaf drawing is proportionally scaled fill the page by using the Selection tool (V).
- Workspace organization: Layers are labeled and on the correct artboards.
Exporting and submitting your exercise:
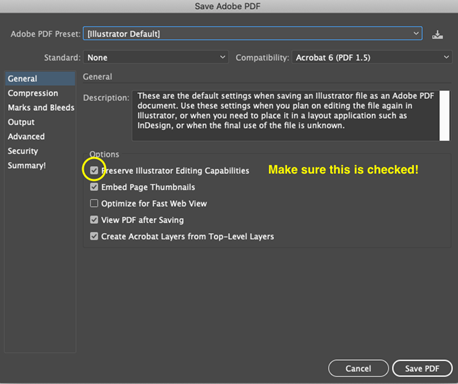
- When you have finished Exercise 0, go to File > Save As…
- Next, select Adobe PDF from the format options.
- In the next window, make sure “Preserve Illustrator Editing Capabilities” is checked!
- Click Save PDF. Be sure you file is labeled correctly! LastName_FirstName Exercise 0.pdf (Example: Anfinson_Erin Exercise 0.pdf)
- Submit the PDF of your completed Exercise 1 file in the class D2L Dropbox