Learning Objectives
Students will demonstrate proficiency in image blending using gradient masks, feathered tools and blending modes
Tools covered & Techniques covered:
Blending modes and Opacity changes
Gradient masks
Using the selection tools and paint bucket to create blended masks
Changing the brush tool settings to draw blended masks
Adjustment layers
Project:
Part 1: Prepare your exercise document and imported exercise images
The provided layer images were all downloaded in a variety of different sizes and resolutions that don’t match the 8”x10,” 300ppi collage canvas. To avoid any surprises and better understand the relationship between image size and resolution, you will take an extra step to prepare each separate collage jpeg before copying and pasting it to your final canvas. TIP: Try this handy online calculator for help with Inches to Pixel calculations in the future!
Create a new 8”x10” Photoshop document (2400px x 3000px)
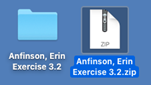
Create a new folder for your Exercise 4 files on your computer’s desktop. Label the folder LastName, FirstName Exercise 4
Open Photoshop and create a new 8”x10,” 300dpi, RGB color space file, White Background. Label your file LastName_FirstName Exercise 4 (Example Anfinson_Erin Exercise 4)
Before you click “Create,” change the document size settings in the drop down menu from Inches to Pixels. Notice the size of your document—2400px x 3000px. Keep this overall pixel x pixel dimension in mind as work on the exercise.
Click “Create.”
Immediately Save this file by going to File > Save or hitting Command S on your keyboard and save it to your Exercise 4 folder
Go to Window > Workspace > Essentials to reset the workspace if necessary.
Open your exercise images, redistribute pixels, and Desaturate the color
Download and open each individual exercise jpeg in Photoshop. Do NOT put these on your 8”x10” file yet!
Redistribute Pixels: Select an image and open the Image Size dialogue box by going to Image > Image Size…
Examine the overall size and resolution of the downloaded image. Redistribute the pixels to 300ppi by typing 300 in the resolution box. Make sure that Resample Image is NOT checked! *Take note of the unchanged pixel x pixel dimension and the changed inch x inch dimension of the image. It will be smaller if the image was less than 300ppi.
Desaturate the image by going to Image > Adjustments > Desaturate
Rotate your image if necessary. Go to Image > Image Rotation > Select the degree you need to rotate your image
Crop your image if necessary. Select the Crop tool (C) from the toolbar on the left side of the workspace.
Click & drag the Crop tool to reframe tighter to the object you want to cut out.
To commit to the crop, hit Enter or click the checkmark in the Crop options bar on top of the workspace. TIP: If at any point you want to cancel the crop, hit the ESC key
Spot heal and repair any damaged areas of your image if necessary (Destructive). Select the Spot Healing Brush tool (J) from the tools panel and many any repairs needed.
Save your changes File > Save or Command S
Click Ok on the following jpeg quality menu and keep your image open.
Repeat steps 1-6 for all of your downloaded collage layer images.
Part 2: Copy and paste individual images into main document
Select an open collage image in the Layers panel, go to Edit > Copy or type Command C
Navigate to your 8”x10” Photoshop document, go to Edit > Paste or type Command V
Your collage layer will be pasted to a new layer in your 8”x10” Photoshop document. WARNING: Do not use the Selection tool (V) to enlarge or shrink the scale of the layer yet!
Double-click the layer in the Layers window and rename the layer.
Repeat steps 1-4 for each open collage image.
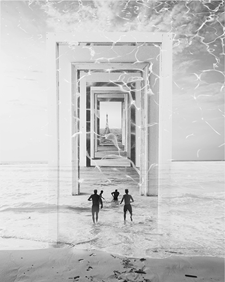
Part 2: Non-destructive Gradient Layer Masks and Blending Modes
Use a Layer Mask and the Gradient tool to blend 2 images
Turn off the visibility of all of your layers except one you select to serve as the background by clicking the eyeball icon. Make sure the image you select covers the entire 8”x10” canvas.
Move this layer to the bottom of the stack and lock it in place in the Layers window by clicking on the Lock icon.
Select an image layer to blend with the base image and move this layer directly on top of the base layer in your layer stack.
Add a mask to this layer by clicking the “Add a layer Mask” icon in the bottom of the Layers window.
Keep the layer mask icon highlighted and activate the Gradient tool (G) in the tool menu (hidden under the Paint Bucket)
Click and drag the gradient tool across image layer and see what happens. *Depending on how your gradient is set up from black to white. Whatever color is on the right of the gradient ramp is the color you start with. For example, if white is on the right, your image will be 100% opacity wherever you first click and will then fade to 0% opacity in the direction you drag the gradient tool.

Continue exploring this tool until you arrive at a blended result you like and be sure to try starting the fade in the middle of the image. TIP: Look for areas in the top and bottom image to visually connect with the blending, like a skyline.
If necessary, use a soft edged Brush tool (Command B) fine tune the edge of the mask, making sure you turn the brush Hardness and Opacity down in the brush properties toolbar.
Save your work (Command S).
Use the Selection, Layer Mask and Paint Bucket tools to create windows through image layers
Select an image with an area where an easy window or opening could be cut and blended in. Windows, doors, other openings, etc…
Use one, or several, of the selection tools—Polygonal Lasso (L), Quick Select (W), or Lasso (L)—to select the area where the window/hole will be cut out.
After your selection is made, use the Paint Bucket tool and Black paint to fill the selection and remove that part of the mask.
Save your work (Command S).
Fill the cut out hole with an image from a different place
Select a different image from your layer stack that might work well to fill the window you just created and create the look of a window into a different space.
Use the Transform tool (Command T) to resize the image to fit within the window you just cut out (Hold the Shift key to keep it proportionate!)
Move the layer beneath the window layer in the stack or by typing Command [
Save your work (Command S).
Explore Blending Modes
Blending modes are different opacity & translucency! Instead of changing the overall opacity to make your layer more translucent, Blending Modes blend the layer with the layer below it in different ways, depending on the properties of the mode you select. For more information about blending modes visit this page in the Adobe online user guide.
Select an image to blend with all or part of your composition with a Blending Mode
Move this image to the top of your entire layer stack to start and keep it selected.
In the Layers panel, click on the Blending Mode drop down menu to open it. (It’s to the left of Opacity and should say “Normal”)
Select one of the Blending Modes from the drop down menu and see what happens. Try “Lighten” or “Screen” to get started.
Save your work (Command S).
Part 3: Using Targeted Adjustment Layers synthesize your blended images
Add targeted/clipped Adjustment Layers to in individual blended image layers
Sometimes you just need to adjust the color or contrast of an individual layer. Through a simple step you can target or clip the adjustment to a single layer or a group of layers in a folder.
Create a new Levels Adjustment Layer by clicking on the Create New Adjustment Layer icon at the bottom of the Layers panel OR go to Layer > New Adjustment Layer > Levels…. The adjustment layer will be added to the top of your stack
Drag the Hue/Saturation Adjustment Layer down the layer stack until it is on top of the individual layer or group folder you want to adjust.
Activate the Adjustment Layer Properties by double clicking the adjustment layer icon.

In the Properties panel, click the Create Clipping Mask icon at the bottom of the properties panel.
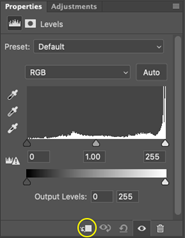
Any adjustments you make will now be targeted to the single layer or group. Make adjustments until you are satisfied with your results.
Save your work (Command S)
Repeat the above steps with other individual layers with the goal of trying to improve the overall synthesis of your blended images.
Save your work (Command S)
Part 4: Wrapping up by adding an additional image to customize your exercise
Select an additional public domain image from Unsplash.com or a personal image to add to your exercise composition and make it uniquely your own. Don’t forget to follow Part 1 to prepare the new image for your composition!
Exercise Requirements (Assessment criteria)
Use of all images from the provided exercise images + one image of student’s choice from Unsplash.com.
Use of Layer Masks with gradients for blending
Use of Selection tool to create and fill a “window” in the composition with another image behind it.
Use of a Blending Mode on at least one layer
Use of Targeted adjustment layers to synthesize the levels of contrast throughout the entire composition.
Additional public domain image added to your exercise file to customize the final composition.
Workspace organization: Layers are labeled
A jpeg is correctly exported and included in your exercise submission
Exporting and submitting your exercise:
Export a jpeg
When you have finished Exercise 4, go to File > Export > Quick Export as JPEG
In the Save As dialogue window, navigate to you Exercise 4 folder, label your image LastName_FirstName Exercise 4.jpeg (Example: Anfinson_Erin Exercise 4.jpeg )
Next, click Save.
Compress your Exercise files and submit via the free file transfer website, WeTransfer.com
Compress or zip your Exercise 4 folder containing the original Photoshop .psd file & the exported jpeg. On a Mac, select the folder and go to File > Compress “Exercise 4 Folder.” A .zip file will be created next to the folder
Go to WeTransfer.com, upload the .zip file, type your name and “Exercise 4” in the Message box, and send it to Erin.Anfinson@mtsu.edu
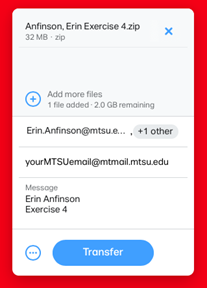
Click Transfer files
You will receive a confirmation email when the transfer is downloaded
Resources and Tutorials:
Get to know the Photoshop Workspace
https://helpx.adobe.com/photoshop/how-to/ps-basics-fundamentals.html