Learning Objectives:
Students will demonstrate knowledge of color theory through dynamic use of monochromatic color scheme values
Students will show experimentation with line through stroke width variation
Students will improve skills in Adobe Illustrator, using workspace organization strategies
Project:
Use the skills you learned in Exercise 2 to create vector drawings of ingredients from a five-ingredient recipe of your choice. Once the ingredients are all drawn, you will use the pattern tool to create a vector pattern of your ingredients. Review the Exercise 2 demo video as needed to complete this project!
Part 1: Research & Sketches
Begin by reviewing the Project 2 Presentation and then research the work of 3 illustrators who create surface pattern designs. This is a very open ended search and I’d suggest starting by exploring the work of a variety of artists who create illustrative themed patterns on Spoonflower.com The artists I the Presentation are also a good place to start but you may use only 1 of them in your research! Write a brief reflection on the work of the artists you researched and include 2 images of his/her work in a word document.
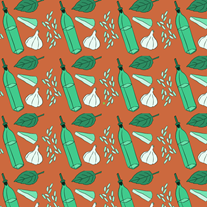
Select a five-ingredient recipe. For example, Pesto ingredients: Olive oil, parmesan cheese, basil, pine nuts, and garlic.
Draw sketches of all five ingredients in your sketchbook. Try to keep the drawing style simple and consistent between the ingredients.
Part 2: Document Setup in Illustrator
Scan or photograph your page of sketches as a jpeg and store it in a new Project 2 folder on your computer. Label this folder LastName_FirstName Project 2. (example: Anfinson_Erin Project 2)
On your computer, create a new Project 2 folder on your computer. Label this folder LastName_FirstName Project 2. (example: Anfinson_Erin Project 2)
Create a new, 300ppi document with one 11” x 11” art board in Illustrator.
Click Create and immediately save your file in the Project 2 folder as LastName_FirstName Project 2.ai (Example: Anfinson_Erin Project 2.ai).
Part 3 : Import your sketches and begin drawing!
Import your scanned ingredient sketches and create a template layer.
In the Layers panel, create and label new layers for each ingredient you will draw (5 total).
Begin tracing your sketches on their individual layers with the Pen (P) and/or Pencil (N) tools. Use the same drawing procedure you learned in Exercise 2, starting with the outlines of the drawings and exploring the use of a varied stroke width profiles using the Width Tool (Shift W)
Don’t forget to double-check that you are drawing each ingredient on its own layer!
When you have the outlines for each ingredient, draw color fill shapes behind your outlines, filling them with light and dark values from a Monochromatic color harmony. When you select your key color, save it in a new Color Group! (Refer to Exercise 2).
When you are finished with your drawings, make a new 11” x 11” artboard. Next, copy and paste all of the ingredient drawings in a new layer called “Expanded Pattern Drawings” in the Layers panel. These are the copies of your drawings you will work with for the pattern.
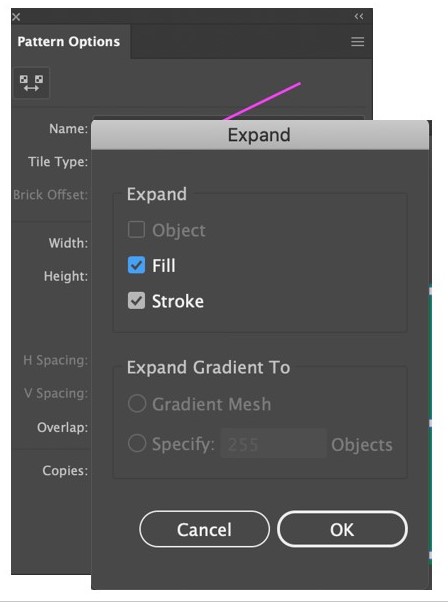
Next, select, copy and paste all of your ingredient drawings in the Expanded Pattern Drawings layer. Keep them selected and move them to the new art board and go to Object > Expand… Make sure Stroke and Fill are checked in the Expand menu. *If Expand isn’t an option, use Expand Appearance, then go back to Object > Expand and proceed.
Save your work and follow the next steps to create a Pattern swatch.
Part 4: Create a pattern from your vectorized sketches
Watch the demo video link on D2L for instructions on how to use the Pattern tool to create a new, editable, pattern swatch. Directions are also below.
If you haven’t, watch the demo video link on D2L. There’s extra tips and even a bonus demo on Replacing color!
Hide or lock your original drawings on Artboard 1 so that you don’t accidently use them.
Arrange the copied and pasted drawings on the new 11” x 11” artboard.
Make sure the Swatches window is open in the workspace, if not, Go to Window > Swatches
Select all of the drawings with the Selection tool (V) and go to Object > Pattern > Make. The Pattern Options dialogue box will open.
Set the Pattern options to the following:
When you arrive at a result you’re pleased with, change the “Dim Copies to:” 100% and zoom out to look at the overall resulting pattern. Make any further changes you feel are necessary.
Add a background color to your pattern by creating a rectangle the same size as your pattern tile size, 3” x 3.” You may need to use the [ and ] keys to move the rectangle behind your drawings.
Select a color from the one of the split complements of the monochromatic key color you used to fill the drawings. For example, if yellow was key hue of the drawings, violet-red or violet-blue could be a background color.
Make sure your rectangle background is centered in the pattern tile so there are no lines or gaps visible in the copies. When you are satisfied with your results, name your pattern and click Done in the upper left hand of the window. Your pattern will be saved in a new swatch.
Finally, select and hide the Expanded Pattern Drawings layer, create a new layer called “Pattern” and draw a square with the Rectangle tool (M) to fill the entire artboard. Fill it with your new ingredient pattern!
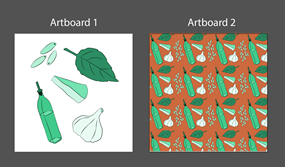
Save your work. When you are finished you will have two 11”x11” Artboards. Artboard 1 will have your drawings. Artboard 2 will be filled with your saved pattern swatch.
Project Requirements
- Initial original project sketches completed in sketchbook by hand and scanned/photographed to use as templates
- Five ingredient drawings vectorized in Illustrator from hand-drawn sketches
- Dynamic use of Monochromatic color scheme values in each drawing’s fill and stroke colors
- Stroke width variation is dynamic and not left uniform in each drawing
- Overall effort and success in creating a consistent approach to the vectorized drawings with the drawing tools, color/value selections, and stroke width profiles. i.e.—Do the drawings look like they go together and synthesize stylistically in the pattern motif?
- Pattern tool is used to create a pattern from the five monochromatic ingredient drawings + a background filled with a split complement color.
- Correct artboard sizes are used
- Workspace organization: All drawings are labeled and create on their own independent layers
Exporting and submitting your exercise:
When you have finished Project 2, go to File > Save As…
Next, select Adobe PDF from the format options.
In the next window, make sure “Preserve Illustrator Editing Capabilities” is checked!
Click Save PDF. Be sure you file is labeled correctly! LastName_FirstName Project 2.pdf (Example: Anfinson_Erin Project 2.pdf)
Submit the exported PDF of your completed Project 2 file in the class D2L Dropbox
Ready to learn more? Check out this online this demo by Irene Demetri for a more in-depth look at the Pattern tool in Illustrator.