Making sure that you accurately document your work is important for the development of your portfolio, job applications, exhibition submissions and more. When documenting your work you are not making a work of art – no filters, no sunsets or sunrises, no cool effects – just straight, accurate documentation.
When photographing large scale sculptures or works that are difficult to set up, shoot lots of photos. Shoot from multiple angles, try out different settings, bulbs. It is better to have too many images to choose from then not enough.
If you would like to work through some sample files you may download 2 RAW images of Mark Mcleod’s work from here – Photographing Work Sample Files.zip (65mb) You will get a pop up saying that there is no preview available or that it can’t scan for viruses. Click Download. If you don’t get a pop up and instead have what looks like a file folder system, you should have a download button in the top right.
DSLR vs Smart Phone
Smart phones have advanced to the point that, in a pinch, they can be used to document your work. Newer iPhones (7 and above) and Android (Samsung S9) both have amazing cameras that are convenient because we always have them with us. There are some instances though when a smart phone just isn’t enough – low light situations, colors that need be accurate, highly textured objects. In these situations a DSLR is going to give you much better results. In general, use a DSLR.
Smartphones
DSLR with additional Equipment
Lighting
When photographing your works you want your lighting to be as close to daylight as possible. If your work is small and you are shooting indoors, use daylight bulbs. Bulbs are rated according to how warm or cold they appear and measured in Kelvin. A 2000k bulb will appear warm while a 6000k bulb will appear blue. Daylight changes but on average you want a 5600k bulb for natural daylight.
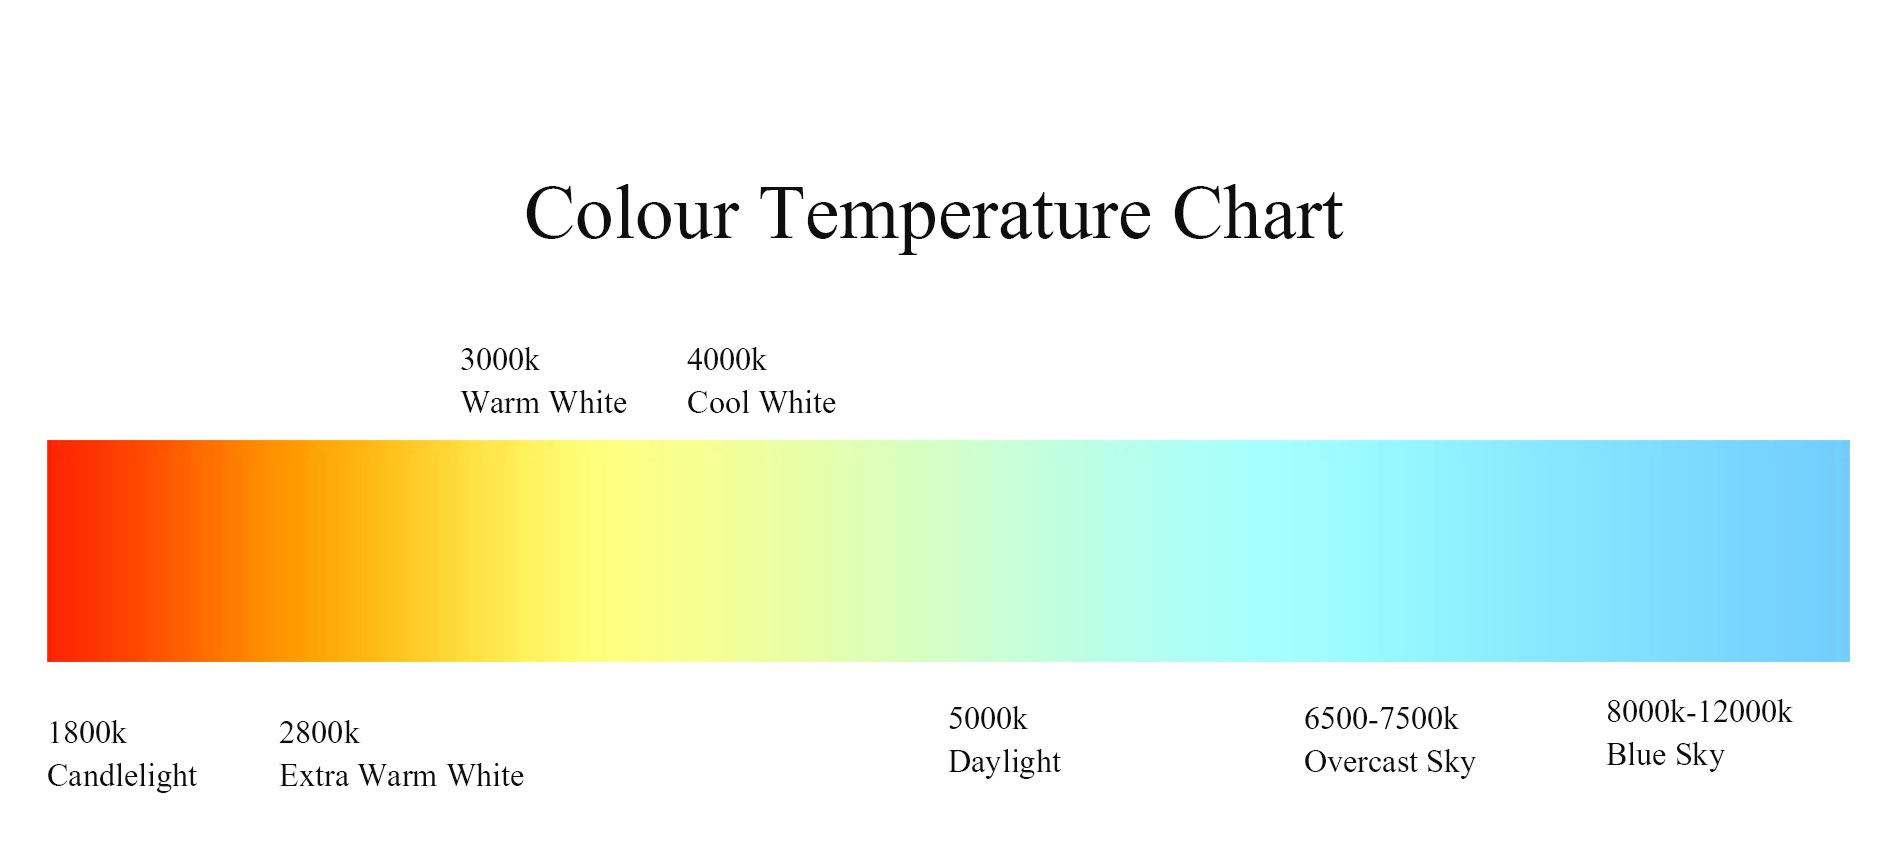
When photographing larger work outdoors, try to avoid sunset and sunrise because the colors will be much warmer. Avoid harsh shadows – an overcast day is usually the best time to photograph.
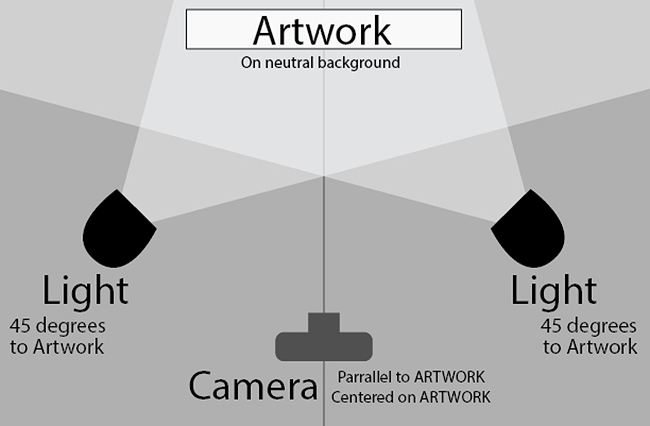
If you are photographing indoors and can control your lights, make sure that you are using the same bulbs in every light source. This might mean turning off the overheads or blocking out windows so you don’t have an odd shift in color. Try to light from both sides at a 45 degree angle and pay close attention to any shadows that may appear.
Color Calibration
Color is probably the most crucial element when documenting your work and there is a lot to think about.
- The color of your work
- The color of your bulbs or daylight
- The color of your images
- The color of your computer screen
- The color of your output (website, printer, projector, tv)
We need to control of many of these as possible. We’ve discussed how to control the first two. Controlling the color of your images is done through color calibration. This can be done by eye but if your work contains a lot of nuanced colors, it is best to purchase a color card and use additional software. The lighting in your room, the light coming in from the windows, your monitor, and the new Night Shift on Macs and Windows all affect how we perceive color. The video below explains the process of using a SpyderCheckr color card and Adobe Lightroom (Classic) to accurately correct colors.
* Tip – Adobe Lightroom CC and Adobe Lightroom Classic are two different pieces of software. Lightroom CC is designed for syncing to cloud and is mobile friendly but not as advanced as Lightroom Classic. For this particular demo you want Lightroom Classic.
Calibrating your computer screen is also important. If the colors you see on your monitor aren’t accurate, trying to calibrate photos in Photoshop or Lightroom will be almost impossible. Mac computers have a built in “by eye” calibration tool that works but is somewhat limited. It is located under Settings > Displays > Color > Calibrate. In older versions of Mac OS the color calibration was more advanced but in newer operating systems it leaves out a lot. There are hardware devices that attach to your monitor that measure for color accuracy with one of the best being from the same company that makes the color card used in the video above – Spyder They start at $170. An alternative is to have the work sitting in front of you as you edit to make sure you get the colors as accurate as possible.
Photographing your work
When you are photographing your work, whether indoors or out, pay attention to your surroundings. Is there a piece of trash or extension cord in the background? Is there something on the table such as paint marks or clutter that will make the piece harder to read? Will you be able to document the work so that the viewer understands what they are looking at? Will you need more than just a front angle?
Editing in Photoshop
You always want to edit your images at the largest file size that your camera and computer can handle. Save compression, resizing and converting to other formats until you are done editing.
Saving your images
Originals, Edited, For Web, For Print. Use an external drive to backup your work – either Time Machine for Macs or my personal favorite, Carbon Copy Cloner.